|
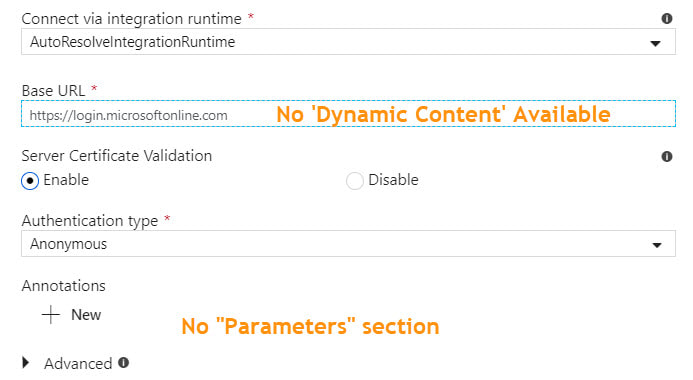
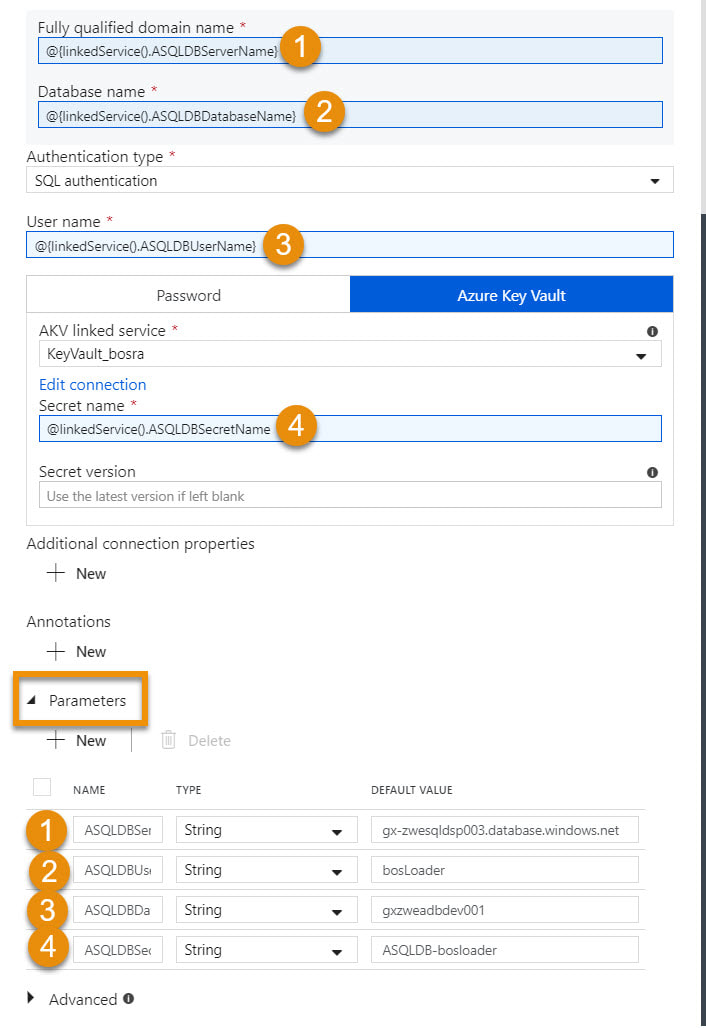
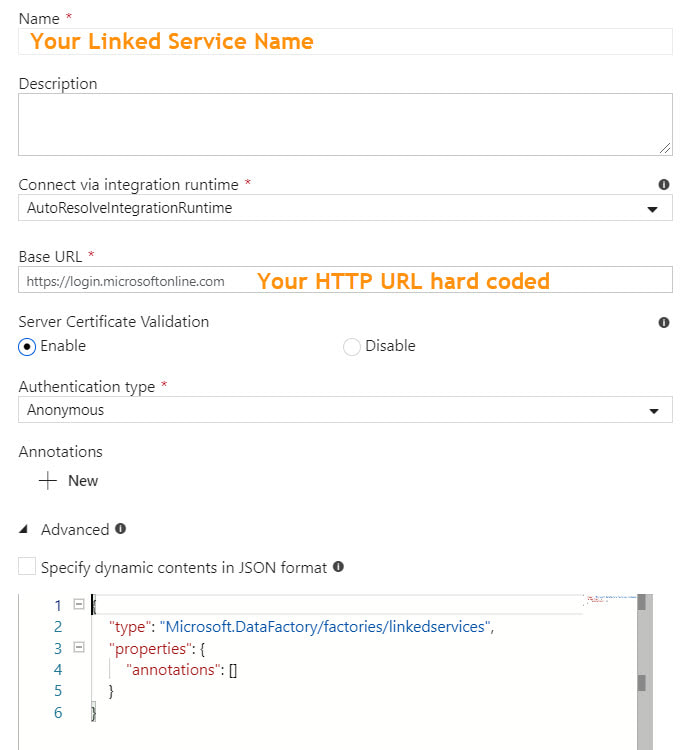
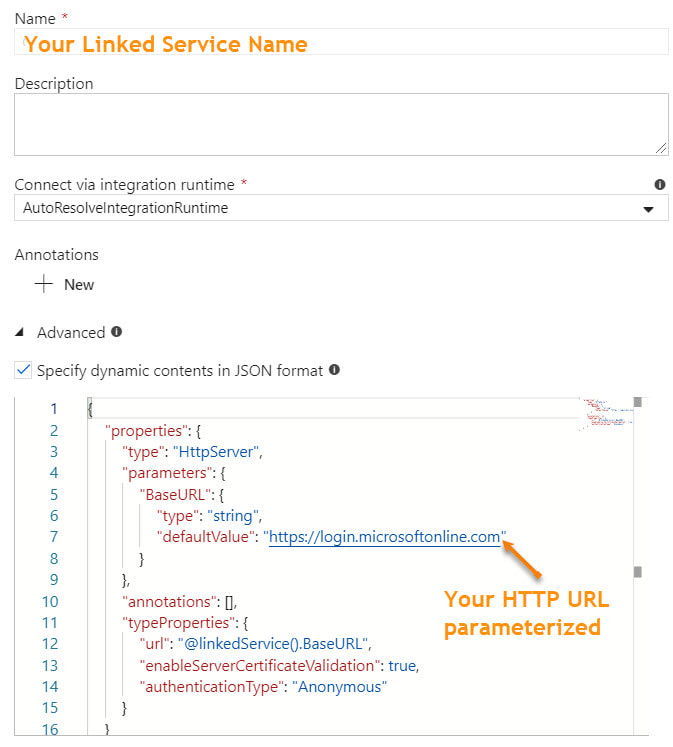
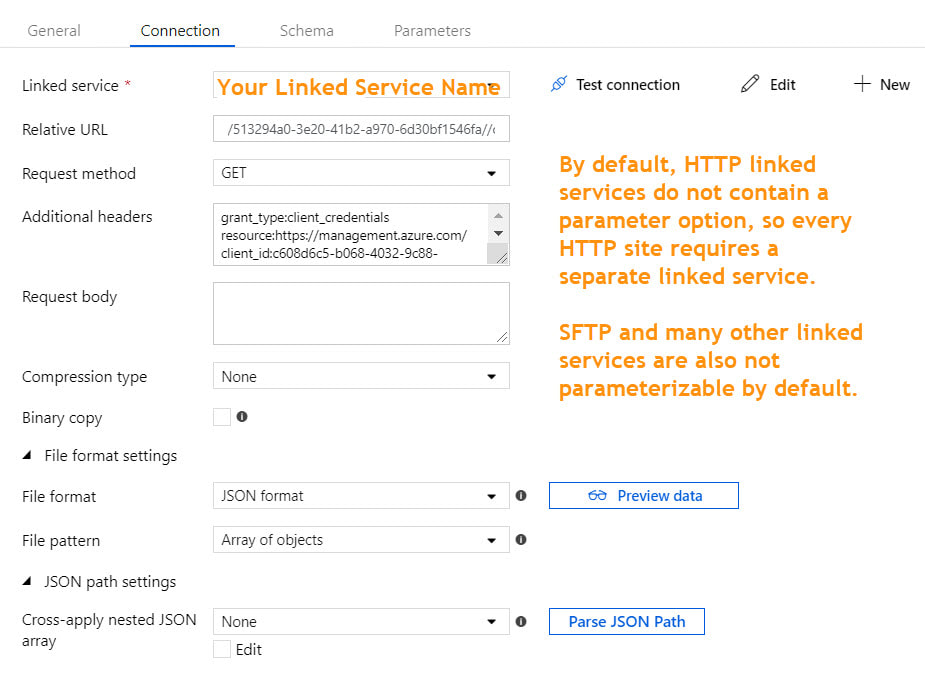
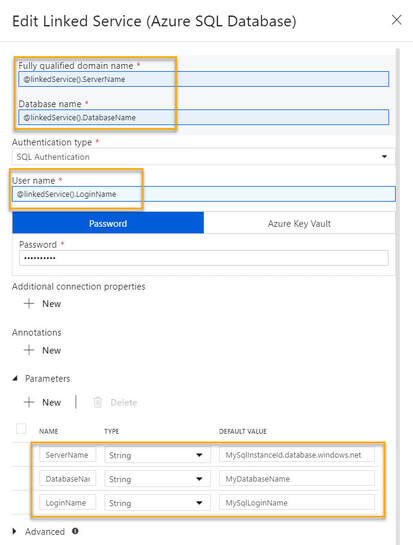
There are several linked service types that do not have built-in dynamic content in which it is possible to reference a parameter. For example, if your linked service is an Azure SQL Database, you can parameterize the server name, database name, user name, and Azure Key Vault secret name. This allows for one linked service for all Azure SQL Databases. However, if your linked service is HTTP or SFTP (or many others), there is no "dynamic content" option for key properties. This forces one linked service and one dataset for every HTTP Base URL or one linked service and dataset for every SFTP host, port and user name. Microsoft has provided a nice solution to this problem, and it lies in the "Advanced" section of each linked service. Understanding that it is JSON syntax that sits behind the GUI of linked services, to add parameters to a linked service, we can manually modify the JSON. At this point and if this blog post were a Microsoft Doc, most of us would be scrolling down and saying, "Just show me the JSON!". Knowing this, here you go -->
***************************************************************************************************************************
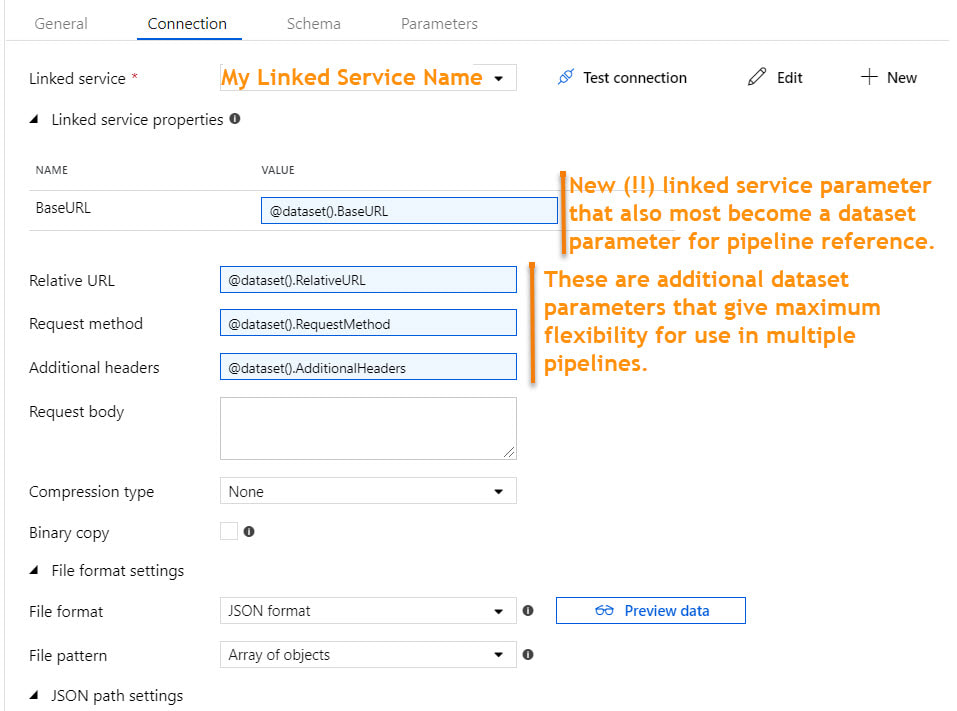
Now the question is, "How does the dataset handle this customized linked service?" I was very pleased to find that the integration of the custom JSON into a dataset was seamless.
One of the nice things about Azure Data Factory (ADFv2) is the level of parameterization now available. Until all linked service properties accept dynamic content by default, this is a nice workaround.
8 Comments
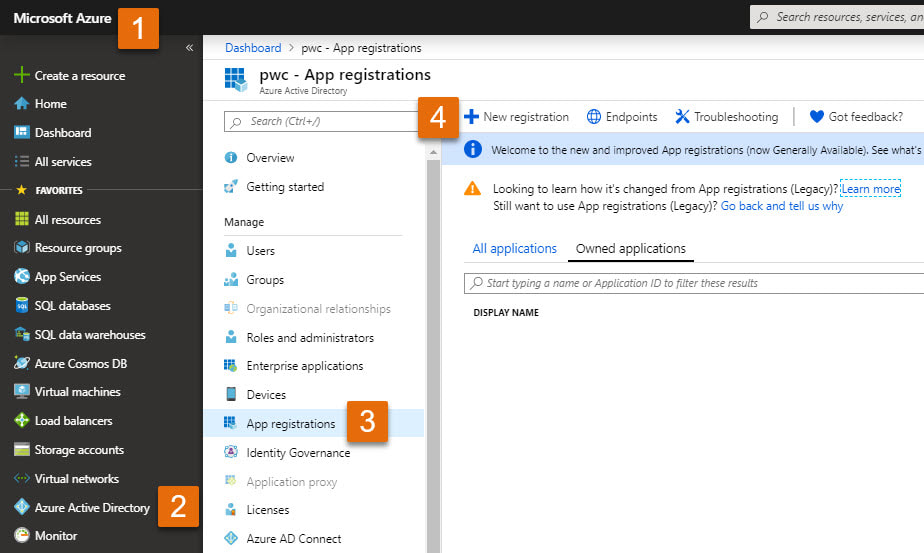
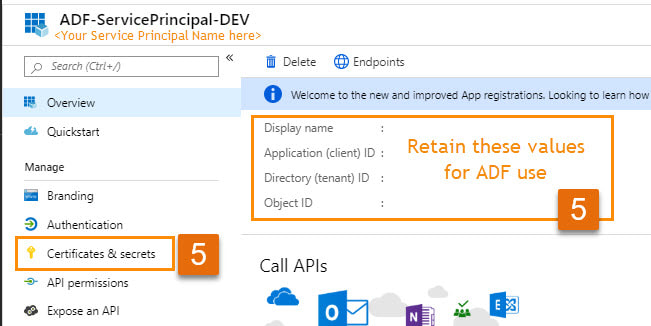
Previously I published a Quick Start Guide for avoiding concurrent pipeline executions. That was blog post 1 of 2, and I wrote it for developers familiar with Azure, especially Azure AD service principals and ADF web activities. For everyone else, I would like to provide more tips and screen prints, because if your brain works anything like mine, I put A and B together much better with a picture. When I first started with ADF and accessed Microsoft Docs, I struggled with connecting the JSON examples provided with the ADF activity UIs (user interfaces). If you had been near, you may have heard me sputtering, "what? What? WHAT??!" Enough said. This blob post will follow the same step numbers as blog post 1, so if you started with the Quick Start Guide, you can find detail for those same steps right here. Step #1: Create a service principal and record the client Id, client secret, and tenant Id for future use. When you query the ADF log, you have to impersonate someone. In ADF you do this through an Azure AD (Active Directory) application, also called a service principal. You then must give this service principal permissions in the Data Factory. If you have worked with SSIS, this is a similar concept. You run SSIS scheduled jobs as <some AD account> and that account must have permissions to your source and destinations.
Step #2: Create a file or SQL Server table to hold your environment properties. This can be a text file, SQL Server table, Cosmos DB document -- any source that can be accessed by ADF in a Lookup activity will work.
Step #3: Create a new pipeline with parameters and variables.
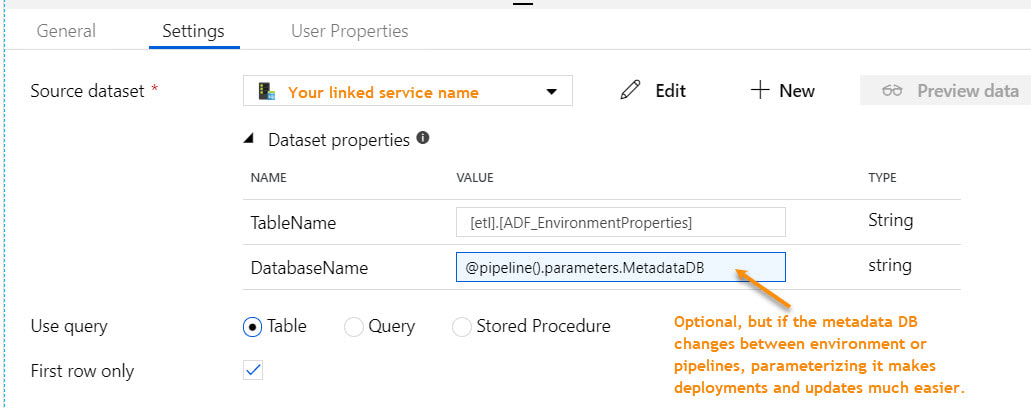
Step #4: Add a Lookup activity to the pipeline named "Get Environment Properties" If you used my SQL Server metadata script above, your lookup activity properties will look similar to the next screen print. To read the data values stored in memory, ADF syntax would be @activity('Get environment Properties').output.firstRow.YourColumnName.
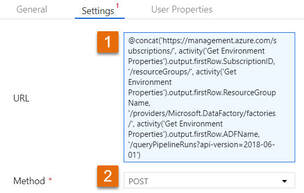
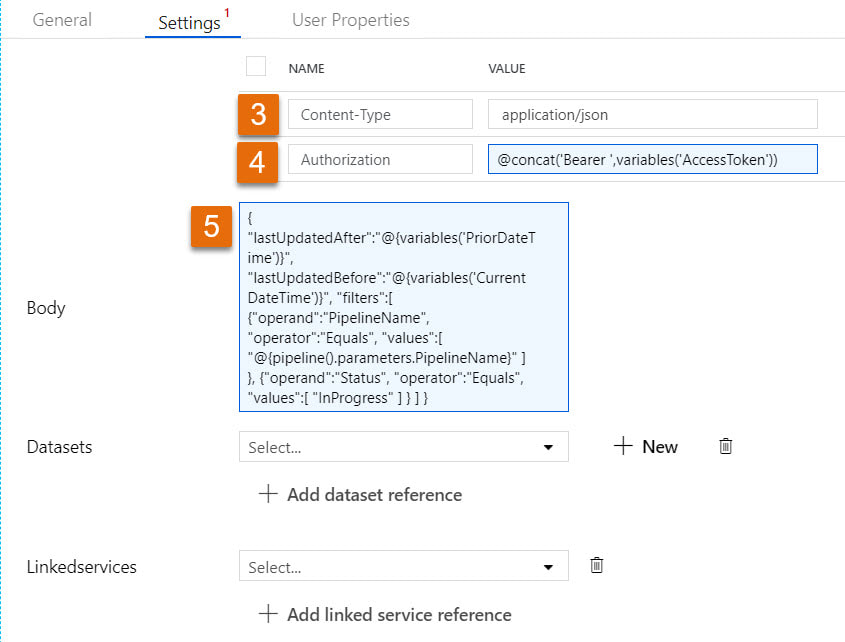
Step #7: Add a second web activity to the pipeline named "Get ADF Execution Metadata" Syntax for this activity is provided in the Microsoft Doc here, but because the documentation leaves so much to the imagination (isn't that a nice way of saying it?), follow the screen prints and copy the syntax provided below. 1 - @concat('https://management.azure.com/subscriptions/', activity('Get Environment Properties').output.firstRow.SubscriptionID, '/resourceGroups/', activity('Get Environment Properties').output.firstRow.ResourceGroupName, '/providers/Microsoft.DataFactory/factories/', activity('Get Environment Properties').output.firstRow.ADFName, '/queryPipelineRuns?api-version=2018-06-01') 3 - application/json 4 - @concat('Bearer ',variables('AccessToken')) 5 - { "lastUpdatedAfter":"@{variables('PriorDateTime')}", "lastUpdatedBefore":"@{variables('CurrentDateTime')}", "filters":[ {"operand":"PipelineName", "operator":"Equals", "values":[ "@{pipeline().parameters.PipelineName}" ] }, {"operand":"Status", "operator":"Equals", "values":[ "InProgress" ] } ] }
Step #10: Connect the pipeline activities all with green Success arrows. I am including a screen shot of the completed pipeline so that you have a visual of how everything comes together.
Conclusion of the Matter: I admire people who can wax eloquent about Azure theory and great ideas. Being a Microsoft tool stack mentor and consultant, I simply do not feel prepared unless I can say "I have a POC for that!" I think of this as a "show me the money!" training technique. This is exactly why I have just written a entire chapter in two blog posts. Friend, "this is the money". Go forth and query your ADF pipeline run metadata with confidence!
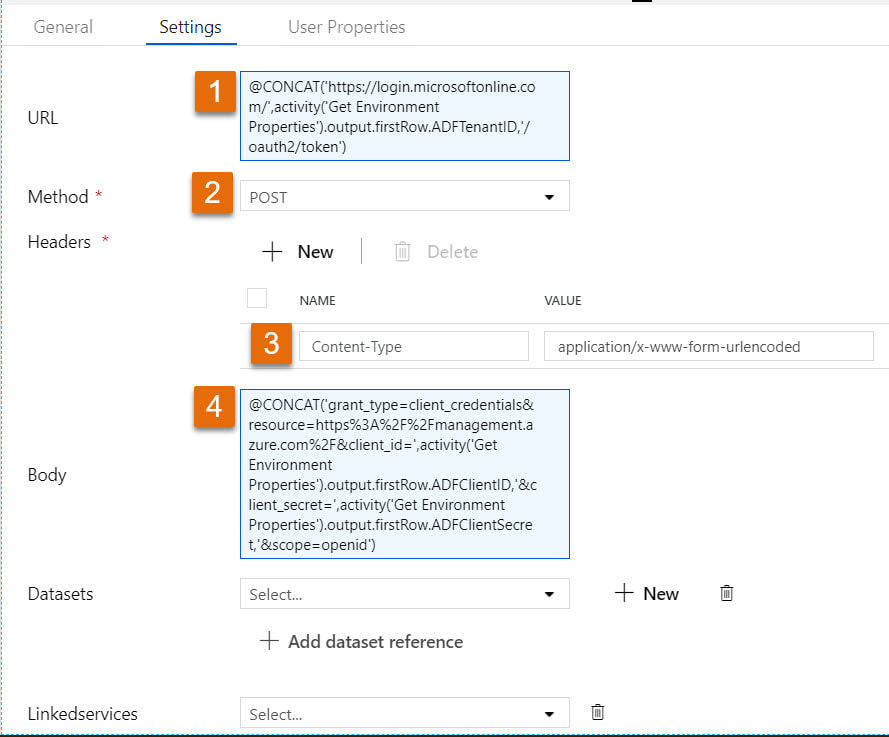
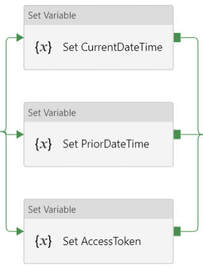
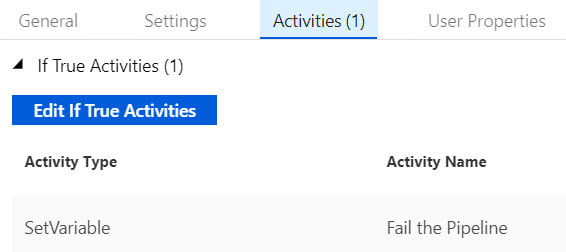
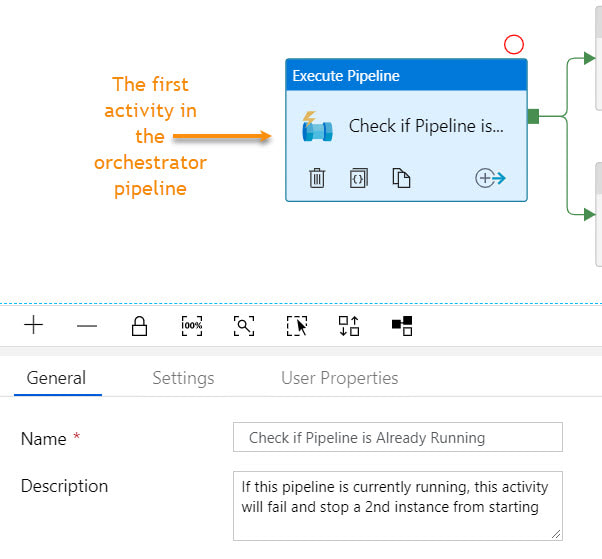
I had a little bit of fun in ADFv2 today and wanted to share my solution for making sure that orchestrator (master) pipelines do not execute concurrently. This can happen for several reasons, but as of August 2019, there is a bug in ADF that causes a single trigger to start a pipeline twice. If you have data-driven incremental loads, this is grossly inconvenient as the metadata tables become completely discombobulated (my technical word of the day). This solution is built on ADFs ability to query pipeline run metadata from the ADF log through a web activity explained here. Come walk with me and let's step through this together. Quick Start Guide If you are familiar with ADF and just want the ten cent tour, follow these steps. Detailed screen prints for each of these steps have been published in blog post 2 of 2 for visual reference. 1. Create a service principal and record the client Id, client secret, tenant Id for future use. 2. Create a file or SQL Server table to hold your environment properties. Add the all three IDs to your environment object. Use Azure Key Vault for your client secret if it is available to you. Assumption: your environment object already contains SubscriptionName, SubscriptionID, ResourceGroupName, and ADFName information. 3. Create a new pipeline with parameters PipelineName as string and MetadataDB as string. Add four variables to the same pipeline named: CurrentDateTime as string, PriorDateTime as string, AccessToken as string and FailThePipeline as boolean. 4. Add a Lookup activity to the pipeline named "Get Environment Properties" and do just that. 5. Add a Web activity to the pipeline named "Get Token" and enter these property values: URL = @concat('https://login.microsoftonline.com/',activity('Get Environment Properties').output.firstRow.ADFTenantID,'/oauth2/token') Method = POST Headers = Content-Type with value = application/x-www-form-urlencoded Body = @concat'grant_type=client_credentials&resource=https%3A%2F%2Fmanagement.azure.com%2F&client_id=',activity('Get Environment Properties').output.firstRow.ADFClientID,'&client_secret=',activity('Get Environment Properties').output.firstRow.ADFClientSecret,'&scope=openid') 6. Add three Set Variable activities to the pipeline and do just that CurrentDateTime variable value = @adddays(utcnow(), +1) PriorDateTime variable value = @adddays(utcnow(), -1) AccessToken variable value = @activity('Get Token').output.access_token 7. Add a second web activity to the pipeline named "Get ADF Execution Metadata URL = @concat('https://management.azure.com/subscriptions/', activity('Get Environment Properties').output.firstRow.SubscriptionID, '/resourceGroups/', activity('Get Environment Properties').output.firstRow.ResourceGroupName, '/providers/Microsoft.DataFactory/factories/', activity('Get Environment Properties').output.firstRow.ADFName, '/queryPipelineRuns?api-version=2018-06-01') Method = POST Headers = Content-Type with value = application/json Authorization with dynamic content value of @concat('Bearer ',variables('AccessToken')) Body = dynamic content value = { "lastUpdatedAfter":"@{variables('PriorDateTime')}", "lastUpdatedBefore":"@{variables('CurrentDateTime')}", "filters":[ {"operand":"PipelineName", "operator":"Equals", "values":[ "@{pipeline().parameters.PipelineName}" ] }, {"operand":"Status", "operator":"Equals", "values":[ "InProgress" ] } ] } 8. Add an If Condition activity to the pipeline named "If Pipeline is Already Running" containing expression dynamic content of @greater(length(activity('Get ADF Execution Metadata').output.value), 1) 9. Add a Set Variable activity to the "If Pipeline is Already Running / If True Activities" activity and name it "Fail the Pipeline" with hard-coded value = Pass string instead of boolean value in order to fail the pipeline. (ADF really needs an "Exit Pipeline" reporting success or failure activity, but let's leave that for another discussion.) 10. Connect the pipeline activities all with green Success arrows. Your pipeline should look like this -->
Conclusion: I have also published blog post 2 of 2 which contains more detailed screen prints, but just because I have a strong desire to help to make you successful (yes, even though we have not met), I have uploaded the JSON code for this pipeline below. Download it and make it your own.
Sometimes I get so involved in my repeatable processes and project management that I forget to look up. Such is the case of the December 2018 ability to parameterize linked services. I could not rollback and rework all the ADF components this impacted which had already gone to production, but oh hooray! Moving forward, we can now have one linked service per type, one dataset per linked service and one pipeline per ingestion pattern. How sweet is that? Au revoir to the days of one SSIS package per table destination. This is blog post 3 of 3 on using parameters in Azure Data Factory (ADF). Blog post #1 was about parameterizing dates and incremental loads. Blog post #2 was about table names and using a single pipeline to stage all tables in a source. Today I am talking about parameterizing linked services. Disclaimer: Not all linked service types can be parameterized at this time. This feature only applies to eight data stores:
Concept Explained: The concept is pretty straightforward and if our goal is to have one linked service per type, a parameterized Azure SQL Database linked service might look like this:
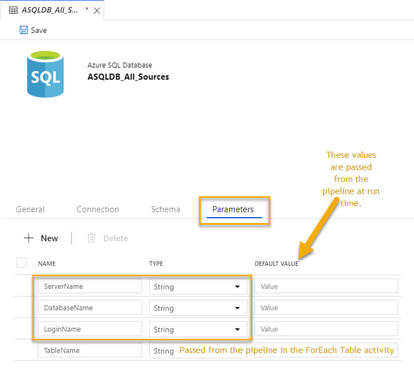
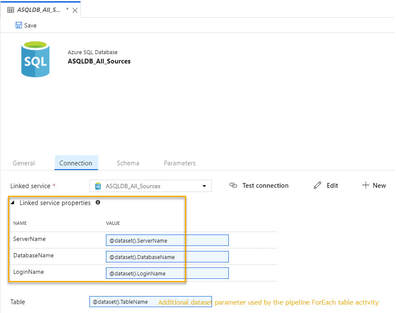
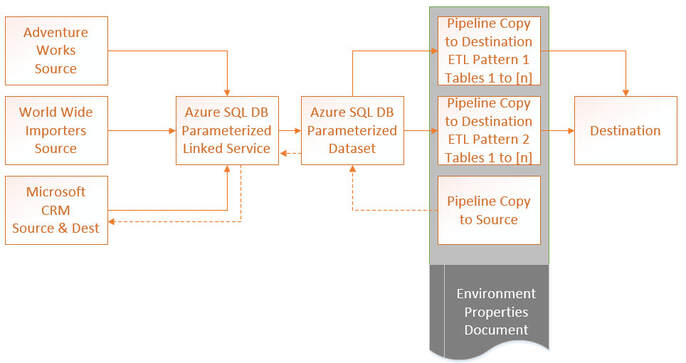
Moving on the the single dataset that uses this linked service, we have the following. Putting it all Together: What we are after here is a repeatable process, simplicity of design, fewer developer hours, easier deployments and more efficient DevOps. We also want very little hard-coding of parameter values; thus the environment properties document. If we find that we have lost flexibility in our pipelines that are "doing to much" and a change impacts "too many destinations", rethink the parameters and kick them up a notch. Even with the above design, we should be able to execute the load of just one source, or just one table of a source. We should also be able to complete data-driven full and incremental loads with these same pipeline activities. Metadata ADF control tables and ADF orchestrator pipelines (pipelines that call other child pipelines and govern dependency), can also be helpful.
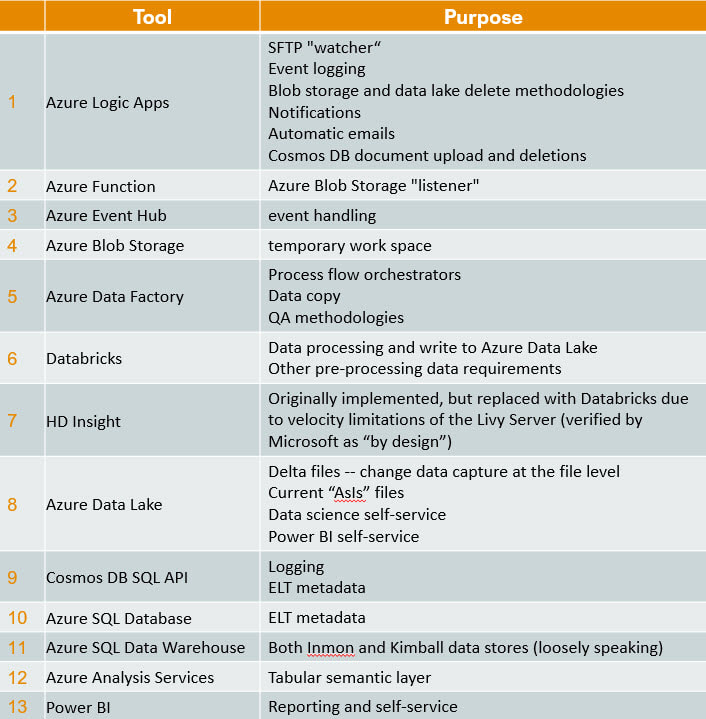
Final Musings: Obviously the above pattern works best if you are staging your data into your destination, then doing your transform and load (ELT). This brings me to a growing realization that with SSIS I had turned away from transform user stored procedures (USPs) and became disciplined in using SSIS in-memory capabilities. With a recent Azure Data Warehouse project, however, I had to renew my love of USPs. So now I am, quite frankly, betwixt and between ADF parameter capabilities for staging, Databricks performance capabilities for transforms, and our old friend, the stored procedure. For everything there is an appropriate place, so once again, let's get back to the architecture diagram and figure out what works best for your unique requirements. This is my second attempt to articulate lessons learned from a recent global Azure implementation for data and analytics. My first blog post became project management centered. You can find project management tips here. While writing it, it became apparent to me that the tool stack isn't the most important thing. I'm pretty hard-core Microsoft, but in the end, success was determined by how well we coached and trained the team -- not what field we played on. Turning my attention in this blog post to technical success points, please allow me to start off by saying that with over twenty countries dropping data into a shared Azure Data Lake, my use of "global" (above) is no exaggeration. I am truly not making this all up by compiling theories from Microsoft Docs. Second, the most frequent question people ask me is "what tools did you use?", because migrating from on-prem, Microsoft SSIS or Informatica to the cloud can feel like jumping off the high dive at the community pool for the first time. Consequently, I'm going to provide the tool stack list right out of the gate. You can find a supporting diagram for this data architecture here. Microsoft Azure Tool Stack for Data & Analytics Hold on, your eyes have already skipped to the list, but before you make an "every man for himself" move and bolt out of the Microsoft community pool, please read my migration blog post. There are options! For example, I just stood up an Azure for Data & Analytics solution that has no logic apps, Azure function, event hub, blob storage, databricks, HDI, or data lake. The solution is not event-driven and takes an ELT (extract, load, and then transform) approach. It reads from sources via Azure Data Factory and writes to an Azure Database logging the ELT activities in an Azure Database as well. Now, how simple is that? Kindly, you don't have to build the Taj MaSolution to be successful. You do have to fully understand your customer's reporting and analysis requirements, and who will be maintaining the solution on a long-term basis. If you still wish to swan dive into the pool, here's the list! Disclaimer: This blog post will not address Analysis Services or Power BI as these are about data delivery and my focus today is data ingestion. Technical Critical Success Points (CSP) Every single line item above has CSPs. How long do you want to hang out with me reading? I'm with you! Consequently, here are my top three CSP areas. Azure Data Factory (ADF)
Azure Data Lake (ADL)
Data Driven Ingestion Methodology
Wrapping It Up Supporting Applications It is only honest to share three supporting applications that help to make all of this possible. Link to creating a Python project in Visual Studio. Link to Azure SQL Data Warehouse Data Tools (Schema Compare) preview information. At the writing of this post, it still has to be requested from Microsoft and direct feedback to Microsoft is expected. Link to integrate Azure Data Factory with GitHub. Link to integrate Databricks with GitHub. Sample Files Below are example of data driven metadata and environment properties. Both are in JSON format.
A Bit of Humor Before You Go
Just for fun, here are some of my favorite sayings in no certain order
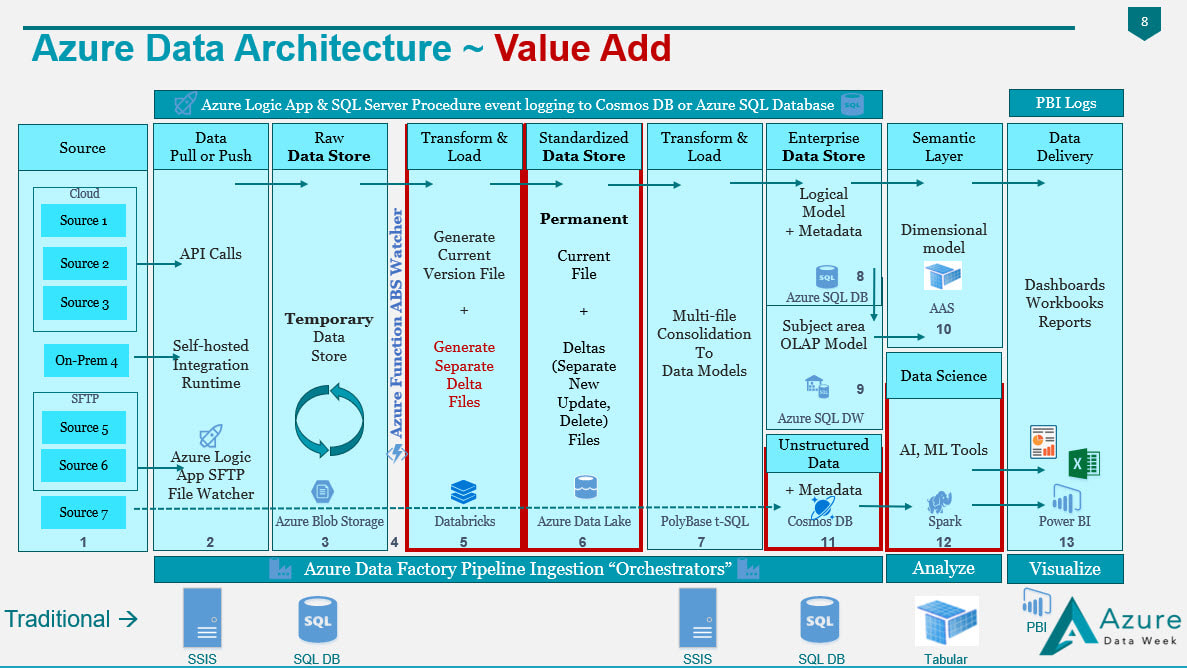
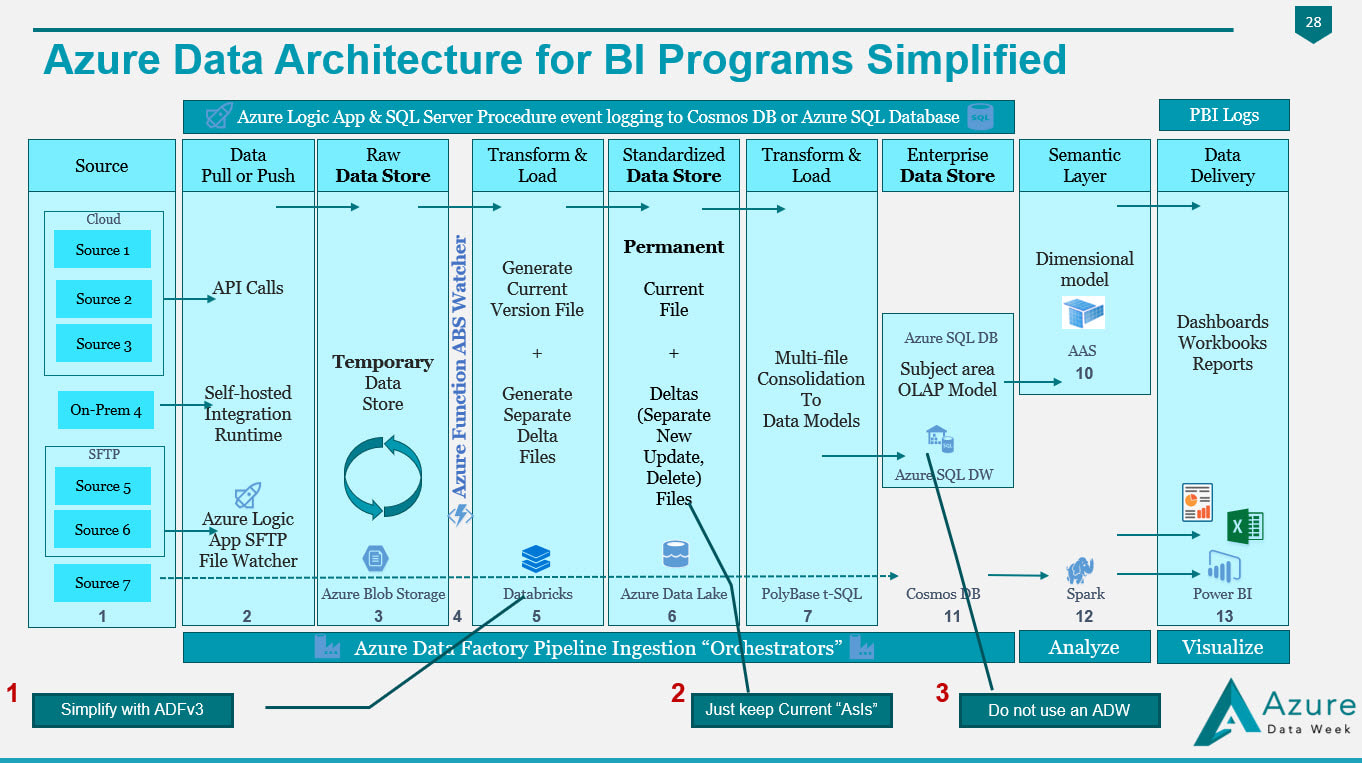
Confession: I put a lot of subtexts in this blog post in an attempt to catch how people may be describing their move from SSIS to ADF, from SQL DBs, to SQL DWs or from scheduled to event-based data ingestion. The purpose of this post is to give you a visual picture of how our well loved "traditional" tools of on-prem SQL Databases, SSIS, SSAS and SSRS are being replaced by the Azure tool stack. If you are moving form "Traditional Microsoft" to "Azure Microsoft" and need a road map, this post is for you. Summary of the Matter: If you only read one thing, please read this: transitioning to Azure is absolutely "doable", but do not let anyone sell you "lift and shift". Azure data architecture is a new way of thinking. Decide to think differently. First Determine Added Value: Below are snippets from a slide deck I shared during Pragmatic Work's 2018 Azure Data Week. (You can still sign up for the minimal cost of $29 and watch all 40 recorded sessions, just click here.) However, before we begin, let's have a little chat. Why in the world would anyone take on an Azure migration if their on-prem SQL database(s) and SSIS packages are humming along with optimum efficiency? The first five reasons given below are my personal favorites.
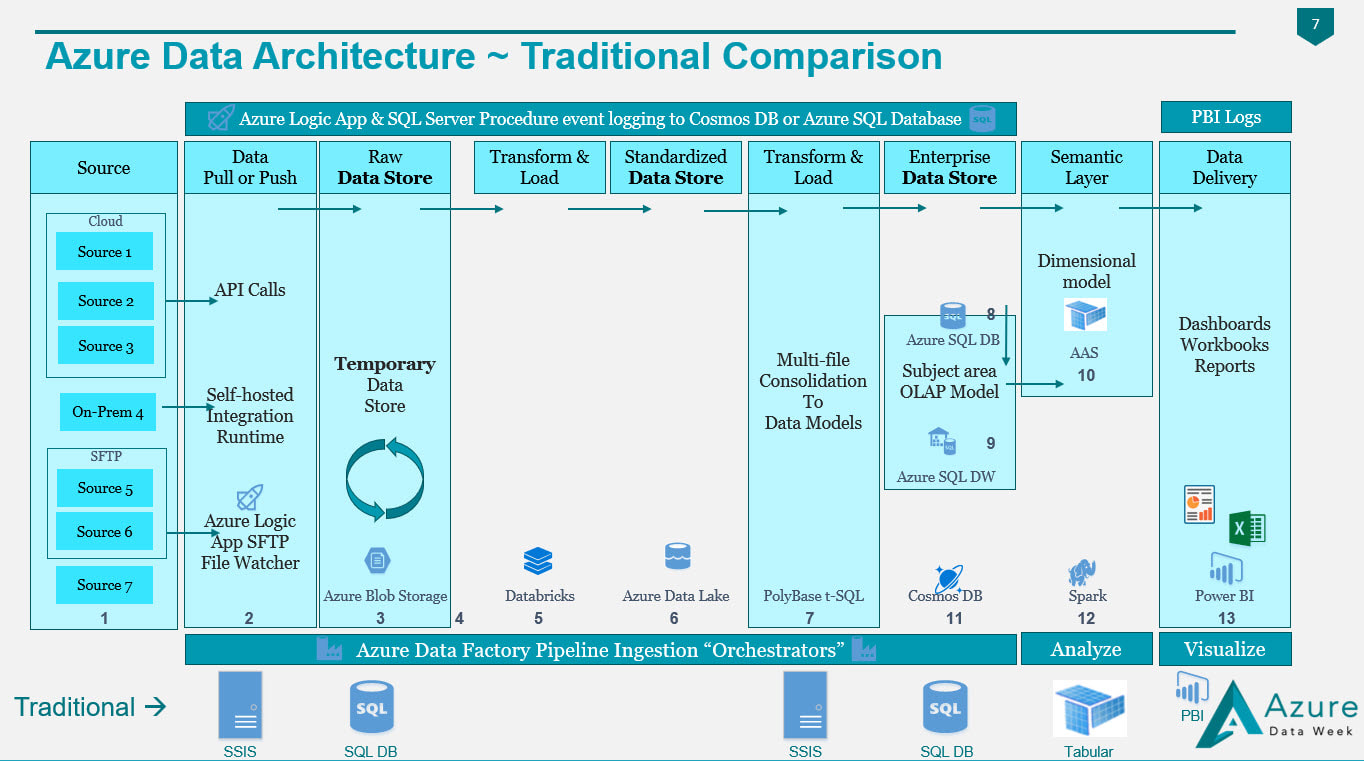
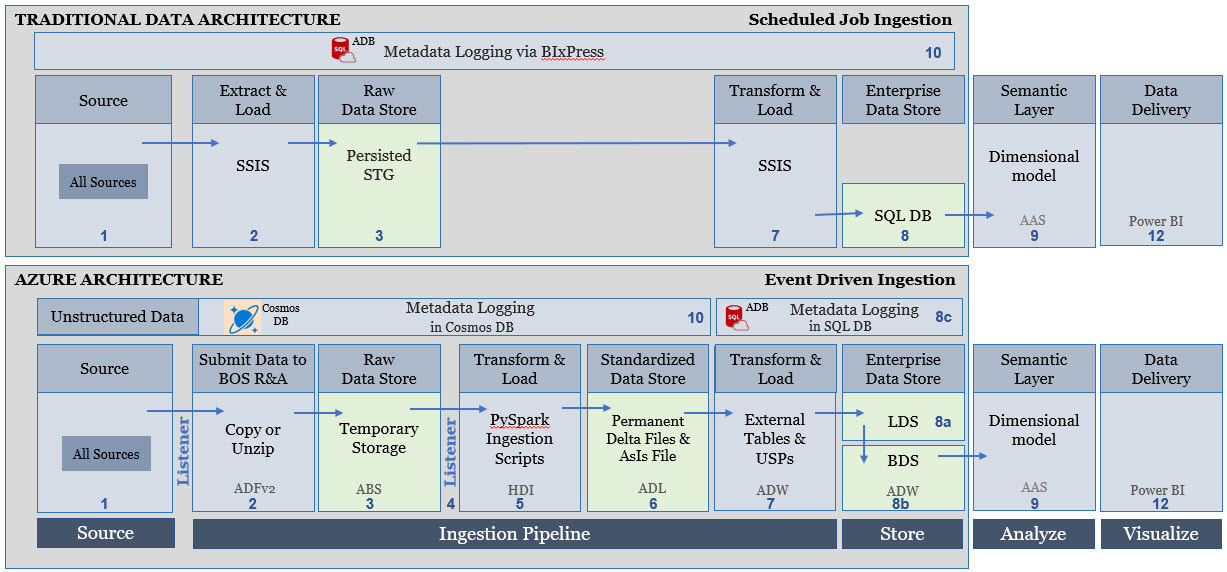
Figure 1 - Value Added by an Azure Data Architecture If you compare my Traditional Data Architecture diagram first posted on this blob site in 2015 and the Azure Data Architecture diagram posted in 2018, I hope that you see what makes the second superior to the first is the value add available from Azure. In both diagrams we are still moving data from "source" to "destination", but what we have with Azure is an infrastructure built for events (i.e. when a row or file is added or modified in a source), near real time data ingestion, unstructured data, and data science. In my thinking, if Azure doesn't give us added value, then why bother. A strict 1:1 "traditional" vs "Azure" data architecture would look something like this (blue boxes only) --> Figure 2 - Traditional Components Aligned with Azure Components It is the "white space" showing in Figure 2 that gives us the added value for an Azure Data Architecture. A diagram that is not from Azure Data Week, but I sometime adapt to explain how to move from "traditional" to "Azure" data architectures is Figure 3. It really is the exact same story as Figure 2, but I've stacked "traditional" and "Azure" in the same diagram. Figure 3 - Traditional Components Aligned with Azure Components (Second Perspective) Tips for Migration: Having worked with SQL Server and data warehouses since 1999 (Microsoft tool stack specifically), I am well aware of the creative solutions to get "near real time" from a SQL Agent job into an on-prem SQL Server, or to query large data sets effectively with column store indexing. For the sake of argument, let's say that nothing is impossible in either architecture. The point I'm trying to make here, however, is rather simple:
Figure 4 In Figure 4, we have made the following substitutions to simplify migration:
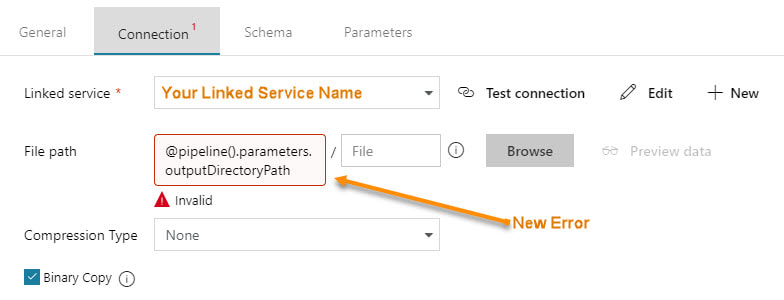
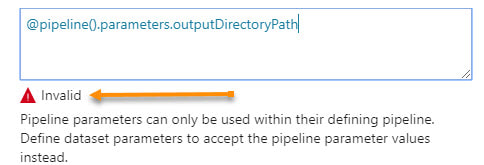
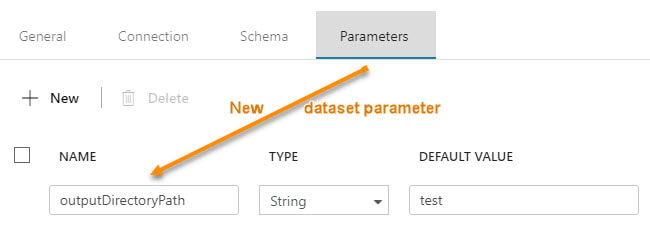
1. We have selected Azure Data Factory version 3 to replace the Python of Databricks or the PySpark of HDInsight. 2. We have removed the change data capture files in Azure Data Lake and are keeping simple "is most recent" files. 3. Unless you have data volumes to justify a data warehouse, which should have a minimum of 1 million rows for each of its 60 partitions, go with an Azure Database! You'll avoid the many creative solutions that Azure Data Warehouse requires to offset its unsupported table features, and stored procedures limitations Every company I work with has a different motivation for moving to Azure, and I'm surely not trying to put you into my box. The diagrams shared on my blob site change with every engagement, as no two companies have the same needs and business goals. Please allow me to encourage you to start thinking as to what your Azure Data Architecture might look like, and what your true value add talking points for a migration to Azure might be. Moving onward and upward, my technical friend, ~Delora Bradish p.s. If you have arrived at the blog post looking for a Database vs Data Warehouse, or Multidimensional vs Tabular discussion, those really are not Azure discussion points as much as they are data volume discussion points; consequently, I did not blog about these talking points here. Please contact me via www.pragmaticworks.com to schedule on site working sessions in either area. Summary of the Matter: Parameter passing in ADFv2 had a slight change in the summer of 2018. Microsoft modified how parameters are passed between pipelines and datasets. Prior, you could reference a pipeline parameter in a dataset without needing to create a matching dataset parameter. The screen prints below explain this much better, and if you are new to ADFv2 and parameter passing, this will give you a nice introduction. I personally feel the change is an improvement. New Warnings and Errors My client had been using ADFv2 since the beginning of 2018, then on a particular Monday, we walked into the office and noticed that our ADFv2 datasets were throwing errors and warnings. Thankfully, Microsoft made this change backward compatible to an extent, so our pipelines were still humming merrily along. The new methodology is actually an improvement, so let's go with it! Here are the summary steps to correct the problem:
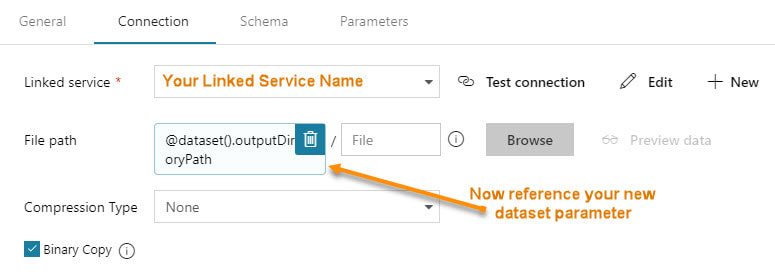
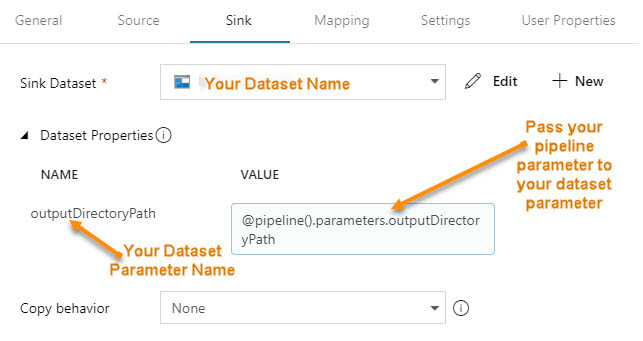
Step #1 - In the dataset, create parameter(s). Step #2 - In the dataset, change the dynamic content to reference the new dataset parameters The content showing above used to read "@pipeline().parameters.outputDirectoryPath". You now have to reference the newly created dataset parameter, "@dataset().outputDirectoryPath". Step #3 - In the calling pipeline, you will now see your new dataset parameters. Enter dynamic content referencing the original pipeline parameter. Conclusion:
The advantage is now we can explicitly pass different values to the dataset. As a dataset is an independent object and is called by a pipeline activity, referencing any sort of pipeline parameter in the dataset causes the dataset to be "orphaned". What if you want to use that dataset in a pipeline that does not have our example parameter "outputDirectoryPath"? Prior, your pipeline would fail, now you can give the dataset parameter a default inside the dataset. Better yet, your two parameter names do not have to match. In step #3, the pipeline screen print immediately above, you can put any parameter reference, system variable or function in the "VALUE". That's pretty much all there is to it! If you haven't already, start editing. In the first of three blog posts on ADFv2 parameter passing, Azure Data Factory (ADFv2) Parameter Passing: Date Filtering (blog post 1 of 3), we pretty much set the ground work. Now that I hope y'll understand how ADFv2 works, let's get rid of some of the hard-coding and make two datasets and one pipeline work for all tables from a single source. You know I have to say it ... can SSIS "show me [this] money"? This solution consists of three ADFv2 objects (yes, only three!!)
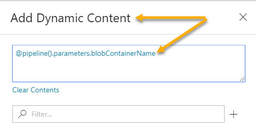
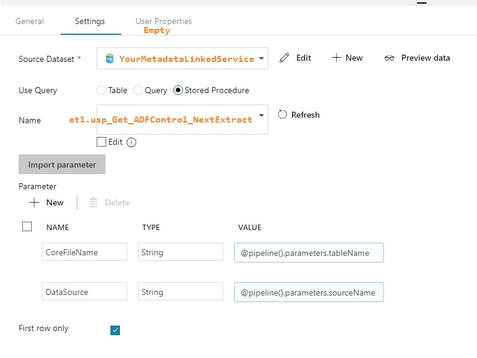
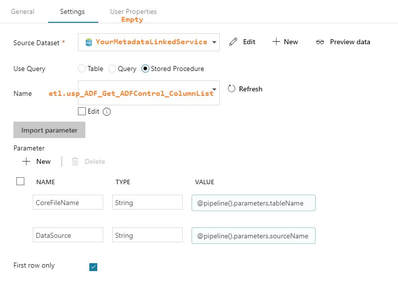
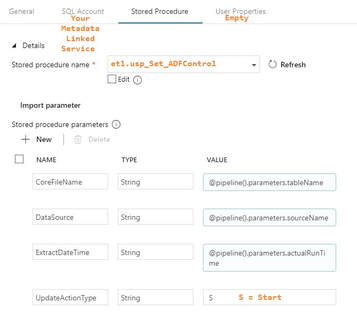
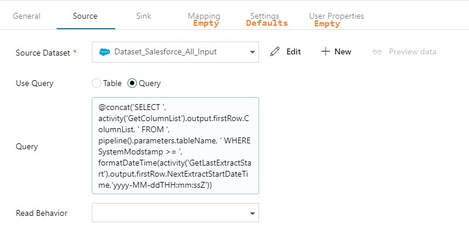
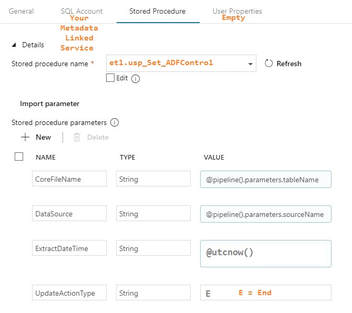
Assumption: You have read blog post 1 of 3 on parameter passing with ADFv2 and now understand the basic concept of parameter passing and concatenating values in ADFv2. Summary: This blog post builds on the first blog and will give you additional examples of how to pass a table name as dynamic content. It will show you how to use a 1.) single input dataset, 2.) single output dataset and 3.) single pipeline to extract data from all tables in a source. Setup: The JSON for all datasets and pipelines is attached below, but if you take a moment to understand the screen prints, it might be easier than reading JSON. 1. Single Input Dataset 2. Single Output Dataset File path prefix --> @pipeline().parameters.blobContainerName File path suffix --> @concat(pipeline().parameters.tableName, '-', formatDateTime(pipeline().parameters.actualRunTime, 'yyyy'), formatDateTime(pipeline().parameters.actualRunTime,'MM'), formatDateTime(pipeline().parameters.actualRunTime,'dd'),' ' , formatDateTime(pipeline().parameters.actualRunTime,'hh'), formatDateTime(pipeline().parameters.actualRunTime, 'mm'), '.txt') Tip: Dynamic content and text values that contain an "@pipline..." syntax are not the same thing. 3. Single ADFv2 Pipeline The primary add-in for this blog post is the lookup for a column list and the additional parameter being used for the table name. The @pipeline().parameters.actualRunTime value is passed by an Azure Logic App not explained here, or you could use the pipeline start or a utcdate. In blog post 3 of 3 we are going to put in a ForEach loop that will allow us to spin through a list of tables. Lookup Activity - GetLastExtractStart Lookup Activity -GetcolumnList Execute Stored Procedure - SetThisExtractStart Copy Activity This is where it all comes together. You concatenate your looked up column list with your looked up table name, and now you are using a single input dataset for all source tables.  @concat('SELECT ', activity('GetColumnList').output.firstRow.ColumnList, ' FROM ', pipeline().parameters.tableName, ' WHERE SystemModstamp >= ', formatDateTime(activity('GetLastExtractStart').output.firstRow.NextExtractStartDateTime,'yyyy-MM-ddTHH:mm:ssZ')) Execute Stored Procedure - SetThisExtractEnd The Conclusion of the Matter: I've taken the time to provide all of these screen prints in loving memory of SSIS. Once you transition, you can figure most of this out with a bit of persistence, but isn't it nice to have screen prints to show you the way sometimes? The most challenging part of this is the @concat() of the source copy activity. Every data source will require this in their own syntax (SOSQL, t-sql etc.), or beware -- in the syntax of the ODBC driver that is sitting behind Microsoft's data connector. Link to Azure Data Factory (ADF) v2 Parameter Passing: Date Filtering (blog post 1 of 3) Link to Azure Data Factory (ADF) v2 Parameters Passing: Linked Services (blog post 3 of 3) Supporting Downloadable Files:
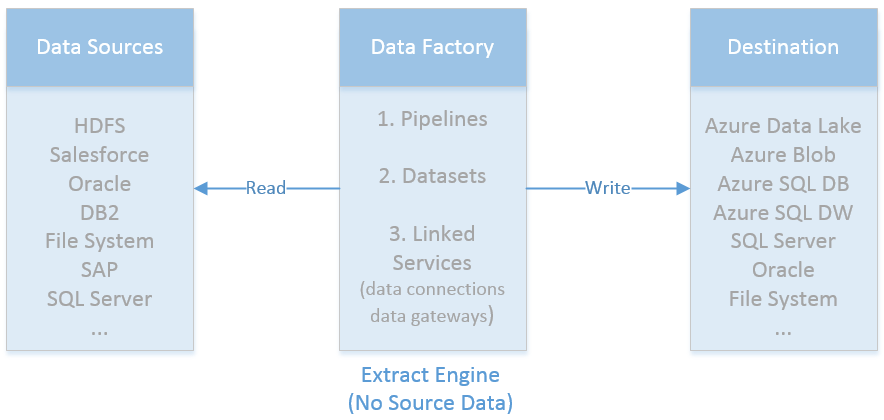
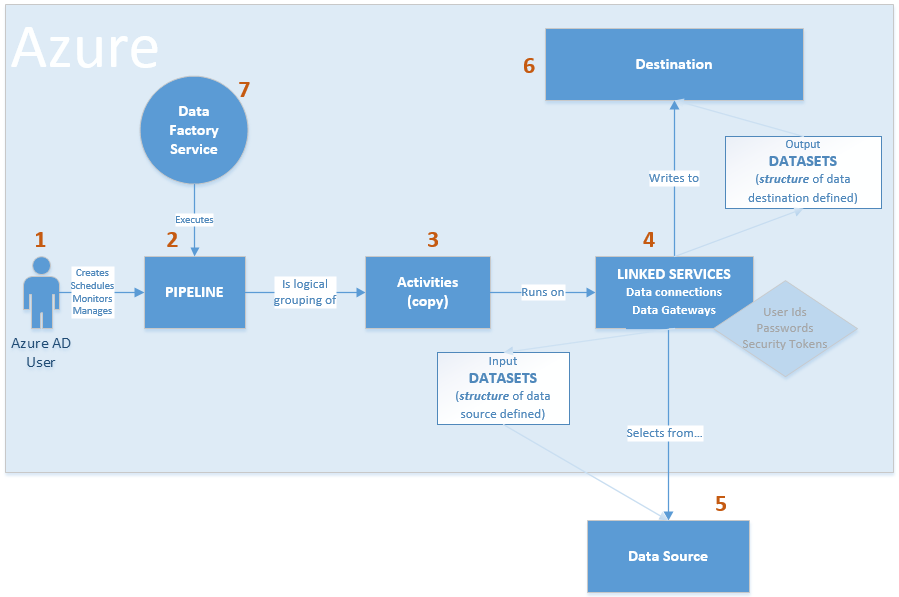
I was asked recently to draw out a visual for Azure Data Factory control flow between source and final Azure Data Lake destination. There are diagrams given in Microsoft's Introduction to Azure Data Factory Service, but I needed to personalize it to tell a customer's individual story. This is the short version of how I see view Azure Data Factory control flow: The longer version of ADF control flow still isn't that complex. However, coming from SQL Server Integration Services (SSIS), I, of course, encountered my most frustrating moments when I expected ADF to be SSIS. That never works. Informatica does not act like SSIS. Tableau is not Power BI Desktop. HP's Vertica does not function exactly like PDW or Azure DW. You get the idea. The point is, we all bring what we know to the party, but we must be willing to learn new tricks. I've started to compile "ADF Tricks" in a formatted Microsoft Word document that I affectionately refer to as my ADF Rule Book. It is basically a bunch of things I learned the hard way, but back to Azure Data Factory control flow. Let's take a deeper dive. 1. That is us! Welcome to the Azure Data Factory party. Our job is to create ADF objects (datasets, linked services and pipelines primarily), schedule, monitor and manage.
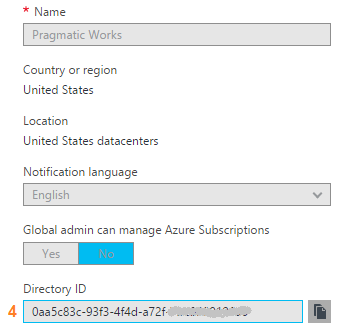
2. Pipelines are similar to SSIS data flows and contain one or more activities. They basically tell ADF "go pick data up from source and write it to destination. Do this every [x number of days...hours...minutes]." There are many other properties, but know this, your success or failure is determined in part by the "start" pipeline property and the "recursive" and "copyBehavior" activity properties. Read up and understand them well. 3. Activities are similar to tasks within a SSIS dataflow. Right now out-of-the-box ADF can only copy. There is no rename, move or delete capabilities on the source or destination. Another things to be clear on is that one source table or file (input dataset) must be matched up with one destination table or file, (output dataset). Each combination is a single activity, and ADF charges by activity. Input and output datasets can only be used by one pipeline. Yes, this means that for full and incremental loads, you either have to double your JSON source code (not recommended) or use source code control deleting one ADF pipeline before creating the other -- assuming they each reference the same input and output datasets. 4. Activities rely on linked services which fall into two categories: data connections and data gateways. Data connections are self-explanatory, but data gateways are how you get from the cloud to on-prem data sources. 5 & 6. You will find a list of Azure Data Factory sources and destinations here. A few tips: * The ADF Copy utility is an easy way to get source data types scripted out. I generally use a sandbox ADF for this, then copy and deploy the JSON with my own naming conventions in my development environment. * The ADF copy utility sometimes misinterprets the source and then resulting ADF datatype. It is an easy fix, but when in doubt, go for string! * ADF currently only support five file types, Text, JSON, Avro, ORC, and Parquet. Note that XML is not in the list. Avro seems the most popular. If you go with Text and are using SSIS to consume destination files from Azure Data Lake (ADL), be aware that Microsoft has forgotten to add a text qualifier property to its SSIS Azure Data Lake Store Source component which renders unusable any ADL text file that has a single end-user-entered string value. 7. The ADF service. I liken this to SQL Agent -- sort of. The "job schedule" is a property inside of the pipeline and it looks to the individual dataset last run times. Furthermore, I am not aware of way to reset a dataset last run time. This proves very challenging when during development you need to run your pipelines on demand. Tip: Keep moving back your "start" pipeline property and redeploy your pipeline. ADF looks at the "schedule" and new "start" pipeline values, checks the last run dateTime of the datasets and thinks, "Hey, those datasets haven't run for January 3rd, I'll run the pipeline now creating destination files for the new January 3rd, but also over-writing January 4th, January 5th ... to current day. " I strongly suggest that you read Azure Data Factory Scheduling Execution at least five times, then move forward to try out Microsoft Azure Scheduler. Azure Data Factory (ADFv1) JSON Example for Salesforce Initial Load RelationalSource Pipeline4/25/2017 This blog post is intended for developers who are new to Azure Data Factory (ADF) and just want a working JSON example. In another blog post here, I've given you the 10K foot view of how data flows through ADF from a developer's perspective. This blog post assumes you understand ADF data flows and are now simply wish for a JSON example of a full initial data load into [somewhere]. The JSON provided here pulls data from Salesforce and creates output files in an Azure Data Lake. Prerequisites: 1. An established Azure subscription 2. An Azure Data Factory resource 3. An Azure Data Lake resource 4. An Azure Active Directory Application that has been given permissions in your Azure Data Lake Short Version to create AD application: AD --> App registrations --> new application registration Short Version to give ADL permissions: ADL --> Data Explorer --> click on top / root folder --> Access JSON Scripts: To extract data from Salesforce using ADF, we first need to create in ADF a linked service for Salesforce. { "name": "SalesforceDataConnection", "properties": { "type": "Salesforce", "typeProperties": { "username": "[email protected]", "password": "MyPassword", "securityToken": "MySecurityTokenObtainedFromSalesforceUI", "environmentUrl": "test.salesforce.com" } }, } Note: If you are pulling from an actual Salesforce data store, not test, your "environmentUrl" will be "login.salesforce.com". We next need a linked service for Azure Data Lake. AAD = Azure Active Directory ADL = Azure Data Lake { "name": "ADLakeConnection", "properties": { "type": "AzureDataLakeStore", "typeProperties": { "dataLakeStoreUri": "https://MyDataLake.azuredatalakestore.net", "servicePrincipalId": "MyAAD-ApplicationID-ServicePrincipalId-ClientId-WhichAreAllTheSameThing", "servicePrincipalKey": "MyAAD-ApplicationID-key", "tenant": "MyAAD-DirectoryID", "subscriptionId": "MyADL-SubscriptionId", "resourceGroupName": "MyADL-ResourceGroup" } }, } The ADF copy wizard will generate this JSON for you, but you still need to know your IDs, so let's talk about where we find all of this. Assuming that you are currently logged in successfully to the Azure Portal ... 1 "datalakeStoreUri": Your Azure Data Lake --> Overview --> URL 2 "servicePrincipalId": Your Azure Active Directory Application --> App registrations --> YourApplicationName --> (click on the application name to see properties) --> ApplicationID 3 "servicePrincipalKey": You must have recorded this when you created the Azure Active Directory application! 4 "tenant": Your Azure Active Directory Application --> Properties --> Directory ID 5 "subscriptionId": Your Azure Data Lake --> Overview --> Subscription ID 6 "resourceGroupName": Your Azure Data Lake --> Overview --> Resource group Here are a couple of screen prints to help you out. from Azure Data Lake from Azure Active Directory --> App registrations from Azure Active Directory --> Properties Note: your Azure Active Directory (AAD) service principal key aka Application ID (in ADF) aka Client ID (in SSIS), must be recorded at the time the Azure Active Directory application is created. There is a pop-up message in AAD which clearly reads, "Copy the key value. You won't be able to retrieve after you leave this blade." Okay, did we survive the creation of an Azure Data Lake linked service? If so, let's move on to creating an ADF input dataset for Salesforce. This JSON uses the Salesforce Account table as an example. { "name": "InputDataset-Account", "properties": { "structure": [ { "name": "Id", "type": "String" }, { "name": "IsDeleted", "type": "Boolean" }, { "name": "MasterRecordId", "type": "String" }, { "name": "Name", "type": "String" }, { "name": "Type", "type": "String" }, <a plethora of more Account columns here. remove this line from your JSON script> { "name": "Is_Processed_by_DP__c", "type": "Boolean" } ], "published": false, "type": "RelationalTable", "linkedServiceName": "SalesforceDataConnection", "typeProperties": { "tableName": "Account" }, "availability": { "frequency": "Day", "interval": 1 }, "external": true, "policy": {} }, } You will need one input (and output) dataset for EVERY Salesforce table. Furthermore, pipelines cannot share datasets, so if you want both an initial and incremental load pipeline, you will need TWO input datasets for every Salesforce table. Personally, I feel this is an ADF travesty, but once I understood pipelines and SliceStart and SliceEnd times, it is understandable howbeit a terrific pain! Okay here is a work-around tip for you: 1. Use a Visual Studio Azure Data Factory solution for source code control. 2. In the VS solution have one JSON script for initial load. Have a second JSON script for incremental load 3. In ADF, delete one pipeline before trying to create the other; in effect, you are toggling between the two JSON scripts using VS as your source code of reference. Moving on, we now need an ADF output dataset. { "name": "OutputDataset-Account", "properties": { "structure": [ { "name": "Id", "type": "String" }, { "name": "IsDeleted", "type": "Boolean" }, { "name": "MasterRecordId", "type": "String" }, { "name": "Name", "type": "String" }, { "name": "Type", "type": "String" }, <a plethora of more Account columns here. Remove this line from your JSON script> { "name": "Is_Processed_by_DP__c", "type": "Boolean" } ], "published": false, "type": "AzureDataLakeStore", "linkedServiceName": "ADLakeConnection", "typeProperties": { "fileName": "Account {Year}{Month}{Day} {Hour}{Minute}.avro", "folderPath": "Salesforce/{Year}{Month}{Day}", "format": { "type": "AvroFormat" }, "partitionedBy": [ { "name": "Year", "value": { "type": "DateTime", "date": "SliceStart", "format": "yyyy" } }, { "name": "Month", "value": { "type": "DateTime", "date": "SliceStart", "format": "MM" } }, { "name": "Day", "value": { "type": "DateTime", "date": "SliceStart", "format": "dd" } }, { "name": "Hour", "value": { "type": "DateTime", "date": "SliceStart", "format": "hh" } }, { "name": "Minute", "value": { "type": "DateTime", "date": "SliceStart", "format": "mm" } } ] }, "availability": { "frequency": "Day", "interval": 1 }, "external": false, "policy": {} }, } Why an AVRO data type? At the writing of this blog post the SSIS Azure Feature Pack contains an Azure Data Lake Source component, but Microsoft forgot to include a text qualifier property. Oops! No one is perfect. Why partitions? This is how ADF creates time slices. In this example, I wanted my Salesforce Account ADL files to sort into nice little MyADL\Salesforce\YYYYMMDD\Account YYYYMMDD HHMM.avro buckets. Now for the grand finale, let's create an ADF pipeline. We are almost home! { "name": "InboundPipeline-SalesforceInitialLoad", "properties": { "activities": [ { "type": "Copy", "typeProperties": { "source": { "type": "RelationalSource", "query": "select * from Account" }, "sink": { "type": "AzureDataLakeStoreSink", "writeBatchSize": 0, "writeBatchTimeout": "00:00:00" } }, "inputs": [ { "name": "InputDataset-Account" } ], "outputs": [ { "name": "OutputDataset-Account" } ], "policy": { "timeout": "1.00:00:00", "concurrency": 1, "executionPriorityOrder": "NewestFirst", "style": "StartOfInterval", "retry": 3, "longRetry": 0, "longRetryInterval": "00:00:00" }, "scheduler": { "frequency": "Day", "interval": 1 }, "name": "Activity-Account" }, <Including Salesforce Opportunity here for your amazement or amusement. Remove this line from your JSON script> { "type": "Copy", "typeProperties": { "source": { "type": "RelationalSource", "query": "select * from Opportunity" }, "sink": { "type": "AzureDataLakeStoreSink", "writeBatchSize": 0, "writeBatchTimeout": "00:00:00" } }, "inputs": [ { "name": "InputDataset-Opportunity" } ], "outputs": [ { "name": "OutputDataset-Opportunity" } ], "policy": { "timeout": "1.00:00:00", "concurrency": 1, "executionPriorityOrder": "NewestFirst", "style": "StartOfInterval", "retry": 3, "longRetry": 0, "longRetryInterval": "00:00:00" }, "scheduler": { "frequency": "Day", "interval": 1 }, "name": "Activity-Opportunity" } ], "start": "2017-04-17T19:48:55.667Z", "end": "2099-12-31T05:00:00Z", "isPaused": false, "pipelineMode": "Scheduled" }, } Getting your new JSON scripts to execute on demand is another blog post. Hint: Your "start" UTC time of your pipeline controls this! Download all JSON scripts below. Enjoy!
|
|||||||||||||||||||||||||||||||||||||||||||||||||||||||||||||||||||||||||||||||||||||||||||||||
| Microsoft Data & AI | All Things Azure |


















 RSS Feed
