|
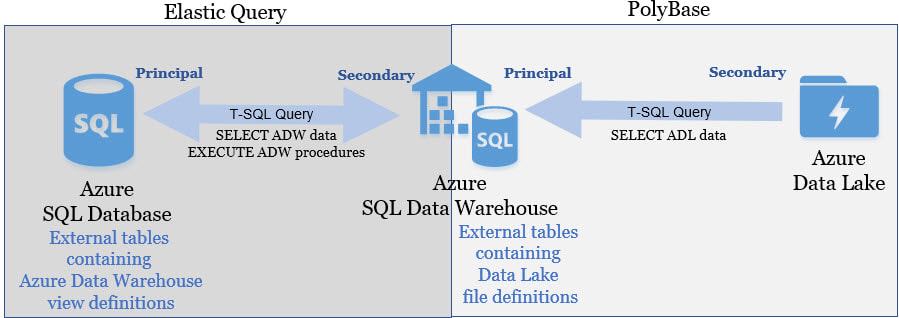
Querying across cloud databases is supported in Azure through elastic queries (in preview). You can read more about that here, but I thought a good talking point would be to briefly compare to elastic query to PolyBase. You can read about PolyBase here. Note: At the righting of this blog post, an Azure Data Warehouse could not serve as a "principal" in an elastic query, but it can be the "secondary".
These two Azure features have similar setup. They both require ...
Polybase is about linking to unstructured data, not another database. That is truly the short version of the matter. On both principal servers shown above the t-sql syntax is the same SELECT ColumnName FROM externalSchemaName.TableName. It is not evident what feature you are using: Elastic Query or PolyBase. Although you can JOIN an internal and external table together, this might fall under the heading "I can, but I won't". It really depends on the size of your tables. I personally do not feel that UNION ALL poses the same performance risk. Conclusion: All said, elastic query is really a nice Azure feature which can solve data migration problems and an easy sharing of reference data. It surely is not a replacement for ETL -- all things in moderation, my friend! There remains a solid need for SSIS or ADFv2. For every Azure offering there is an appropriate implementation place.
0 Comments
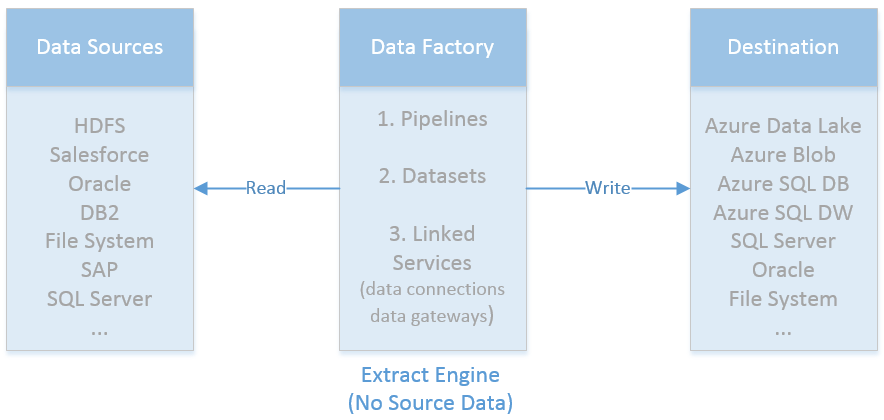
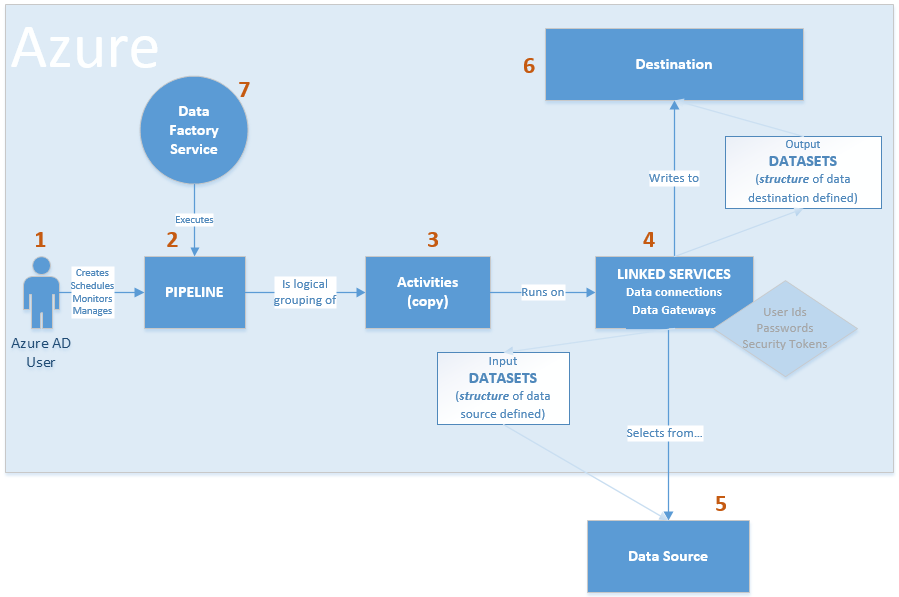
I was asked recently to draw out a visual for Azure Data Factory control flow between source and final Azure Data Lake destination. There are diagrams given in Microsoft's Introduction to Azure Data Factory Service, but I needed to personalize it to tell a customer's individual story. This is the short version of how I see view Azure Data Factory control flow: The longer version of ADF control flow still isn't that complex. However, coming from SQL Server Integration Services (SSIS), I, of course, encountered my most frustrating moments when I expected ADF to be SSIS. That never works. Informatica does not act like SSIS. Tableau is not Power BI Desktop. HP's Vertica does not function exactly like PDW or Azure DW. You get the idea. The point is, we all bring what we know to the party, but we must be willing to learn new tricks. I've started to compile "ADF Tricks" in a formatted Microsoft Word document that I affectionately refer to as my ADF Rule Book. It is basically a bunch of things I learned the hard way, but back to Azure Data Factory control flow. Let's take a deeper dive. 1. That is us! Welcome to the Azure Data Factory party. Our job is to create ADF objects (datasets, linked services and pipelines primarily), schedule, monitor and manage.
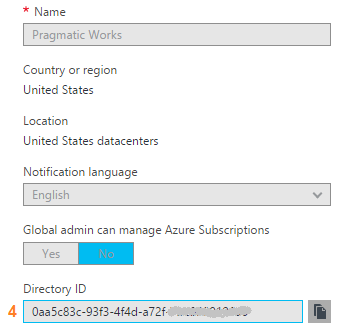
2. Pipelines are similar to SSIS data flows and contain one or more activities. They basically tell ADF "go pick data up from source and write it to destination. Do this every [x number of days...hours...minutes]." There are many other properties, but know this, your success or failure is determined in part by the "start" pipeline property and the "recursive" and "copyBehavior" activity properties. Read up and understand them well. 3. Activities are similar to tasks within a SSIS dataflow. Right now out-of-the-box ADF can only copy. There is no rename, move or delete capabilities on the source or destination. Another things to be clear on is that one source table or file (input dataset) must be matched up with one destination table or file, (output dataset). Each combination is a single activity, and ADF charges by activity. Input and output datasets can only be used by one pipeline. Yes, this means that for full and incremental loads, you either have to double your JSON source code (not recommended) or use source code control deleting one ADF pipeline before creating the other -- assuming they each reference the same input and output datasets. 4. Activities rely on linked services which fall into two categories: data connections and data gateways. Data connections are self-explanatory, but data gateways are how you get from the cloud to on-prem data sources. 5 & 6. You will find a list of Azure Data Factory sources and destinations here. A few tips: * The ADF Copy utility is an easy way to get source data types scripted out. I generally use a sandbox ADF for this, then copy and deploy the JSON with my own naming conventions in my development environment. * The ADF copy utility sometimes misinterprets the source and then resulting ADF datatype. It is an easy fix, but when in doubt, go for string! * ADF currently only support five file types, Text, JSON, Avro, ORC, and Parquet. Note that XML is not in the list. Avro seems the most popular. If you go with Text and are using SSIS to consume destination files from Azure Data Lake (ADL), be aware that Microsoft has forgotten to add a text qualifier property to its SSIS Azure Data Lake Store Source component which renders unusable any ADL text file that has a single end-user-entered string value. 7. The ADF service. I liken this to SQL Agent -- sort of. The "job schedule" is a property inside of the pipeline and it looks to the individual dataset last run times. Furthermore, I am not aware of way to reset a dataset last run time. This proves very challenging when during development you need to run your pipelines on demand. Tip: Keep moving back your "start" pipeline property and redeploy your pipeline. ADF looks at the "schedule" and new "start" pipeline values, checks the last run dateTime of the datasets and thinks, "Hey, those datasets haven't run for January 3rd, I'll run the pipeline now creating destination files for the new January 3rd, but also over-writing January 4th, January 5th ... to current day. " I strongly suggest that you read Azure Data Factory Scheduling Execution at least five times, then move forward to try out Microsoft Azure Scheduler. Azure Data Factory (ADFv1) JSON Example for Salesforce Initial Load RelationalSource Pipeline4/25/2017 This blog post is intended for developers who are new to Azure Data Factory (ADF) and just want a working JSON example. In another blog post here, I've given you the 10K foot view of how data flows through ADF from a developer's perspective. This blog post assumes you understand ADF data flows and are now simply wish for a JSON example of a full initial data load into [somewhere]. The JSON provided here pulls data from Salesforce and creates output files in an Azure Data Lake. Prerequisites: 1. An established Azure subscription 2. An Azure Data Factory resource 3. An Azure Data Lake resource 4. An Azure Active Directory Application that has been given permissions in your Azure Data Lake Short Version to create AD application: AD --> App registrations --> new application registration Short Version to give ADL permissions: ADL --> Data Explorer --> click on top / root folder --> Access JSON Scripts: To extract data from Salesforce using ADF, we first need to create in ADF a linked service for Salesforce. { "name": "SalesforceDataConnection", "properties": { "type": "Salesforce", "typeProperties": { "username": "[email protected]", "password": "MyPassword", "securityToken": "MySecurityTokenObtainedFromSalesforceUI", "environmentUrl": "test.salesforce.com" } }, } Note: If you are pulling from an actual Salesforce data store, not test, your "environmentUrl" will be "login.salesforce.com". We next need a linked service for Azure Data Lake. AAD = Azure Active Directory ADL = Azure Data Lake { "name": "ADLakeConnection", "properties": { "type": "AzureDataLakeStore", "typeProperties": { "dataLakeStoreUri": "https://MyDataLake.azuredatalakestore.net", "servicePrincipalId": "MyAAD-ApplicationID-ServicePrincipalId-ClientId-WhichAreAllTheSameThing", "servicePrincipalKey": "MyAAD-ApplicationID-key", "tenant": "MyAAD-DirectoryID", "subscriptionId": "MyADL-SubscriptionId", "resourceGroupName": "MyADL-ResourceGroup" } }, } The ADF copy wizard will generate this JSON for you, but you still need to know your IDs, so let's talk about where we find all of this. Assuming that you are currently logged in successfully to the Azure Portal ... 1 "datalakeStoreUri": Your Azure Data Lake --> Overview --> URL 2 "servicePrincipalId": Your Azure Active Directory Application --> App registrations --> YourApplicationName --> (click on the application name to see properties) --> ApplicationID 3 "servicePrincipalKey": You must have recorded this when you created the Azure Active Directory application! 4 "tenant": Your Azure Active Directory Application --> Properties --> Directory ID 5 "subscriptionId": Your Azure Data Lake --> Overview --> Subscription ID 6 "resourceGroupName": Your Azure Data Lake --> Overview --> Resource group Here are a couple of screen prints to help you out. from Azure Data Lake from Azure Active Directory --> App registrations from Azure Active Directory --> Properties Note: your Azure Active Directory (AAD) service principal key aka Application ID (in ADF) aka Client ID (in SSIS), must be recorded at the time the Azure Active Directory application is created. There is a pop-up message in AAD which clearly reads, "Copy the key value. You won't be able to retrieve after you leave this blade." Okay, did we survive the creation of an Azure Data Lake linked service? If so, let's move on to creating an ADF input dataset for Salesforce. This JSON uses the Salesforce Account table as an example. { "name": "InputDataset-Account", "properties": { "structure": [ { "name": "Id", "type": "String" }, { "name": "IsDeleted", "type": "Boolean" }, { "name": "MasterRecordId", "type": "String" }, { "name": "Name", "type": "String" }, { "name": "Type", "type": "String" }, <a plethora of more Account columns here. remove this line from your JSON script> { "name": "Is_Processed_by_DP__c", "type": "Boolean" } ], "published": false, "type": "RelationalTable", "linkedServiceName": "SalesforceDataConnection", "typeProperties": { "tableName": "Account" }, "availability": { "frequency": "Day", "interval": 1 }, "external": true, "policy": {} }, } You will need one input (and output) dataset for EVERY Salesforce table. Furthermore, pipelines cannot share datasets, so if you want both an initial and incremental load pipeline, you will need TWO input datasets for every Salesforce table. Personally, I feel this is an ADF travesty, but once I understood pipelines and SliceStart and SliceEnd times, it is understandable howbeit a terrific pain! Okay here is a work-around tip for you: 1. Use a Visual Studio Azure Data Factory solution for source code control. 2. In the VS solution have one JSON script for initial load. Have a second JSON script for incremental load 3. In ADF, delete one pipeline before trying to create the other; in effect, you are toggling between the two JSON scripts using VS as your source code of reference. Moving on, we now need an ADF output dataset. { "name": "OutputDataset-Account", "properties": { "structure": [ { "name": "Id", "type": "String" }, { "name": "IsDeleted", "type": "Boolean" }, { "name": "MasterRecordId", "type": "String" }, { "name": "Name", "type": "String" }, { "name": "Type", "type": "String" }, <a plethora of more Account columns here. Remove this line from your JSON script> { "name": "Is_Processed_by_DP__c", "type": "Boolean" } ], "published": false, "type": "AzureDataLakeStore", "linkedServiceName": "ADLakeConnection", "typeProperties": { "fileName": "Account {Year}{Month}{Day} {Hour}{Minute}.avro", "folderPath": "Salesforce/{Year}{Month}{Day}", "format": { "type": "AvroFormat" }, "partitionedBy": [ { "name": "Year", "value": { "type": "DateTime", "date": "SliceStart", "format": "yyyy" } }, { "name": "Month", "value": { "type": "DateTime", "date": "SliceStart", "format": "MM" } }, { "name": "Day", "value": { "type": "DateTime", "date": "SliceStart", "format": "dd" } }, { "name": "Hour", "value": { "type": "DateTime", "date": "SliceStart", "format": "hh" } }, { "name": "Minute", "value": { "type": "DateTime", "date": "SliceStart", "format": "mm" } } ] }, "availability": { "frequency": "Day", "interval": 1 }, "external": false, "policy": {} }, } Why an AVRO data type? At the writing of this blog post the SSIS Azure Feature Pack contains an Azure Data Lake Source component, but Microsoft forgot to include a text qualifier property. Oops! No one is perfect. Why partitions? This is how ADF creates time slices. In this example, I wanted my Salesforce Account ADL files to sort into nice little MyADL\Salesforce\YYYYMMDD\Account YYYYMMDD HHMM.avro buckets. Now for the grand finale, let's create an ADF pipeline. We are almost home! { "name": "InboundPipeline-SalesforceInitialLoad", "properties": { "activities": [ { "type": "Copy", "typeProperties": { "source": { "type": "RelationalSource", "query": "select * from Account" }, "sink": { "type": "AzureDataLakeStoreSink", "writeBatchSize": 0, "writeBatchTimeout": "00:00:00" } }, "inputs": [ { "name": "InputDataset-Account" } ], "outputs": [ { "name": "OutputDataset-Account" } ], "policy": { "timeout": "1.00:00:00", "concurrency": 1, "executionPriorityOrder": "NewestFirst", "style": "StartOfInterval", "retry": 3, "longRetry": 0, "longRetryInterval": "00:00:00" }, "scheduler": { "frequency": "Day", "interval": 1 }, "name": "Activity-Account" }, <Including Salesforce Opportunity here for your amazement or amusement. Remove this line from your JSON script> { "type": "Copy", "typeProperties": { "source": { "type": "RelationalSource", "query": "select * from Opportunity" }, "sink": { "type": "AzureDataLakeStoreSink", "writeBatchSize": 0, "writeBatchTimeout": "00:00:00" } }, "inputs": [ { "name": "InputDataset-Opportunity" } ], "outputs": [ { "name": "OutputDataset-Opportunity" } ], "policy": { "timeout": "1.00:00:00", "concurrency": 1, "executionPriorityOrder": "NewestFirst", "style": "StartOfInterval", "retry": 3, "longRetry": 0, "longRetryInterval": "00:00:00" }, "scheduler": { "frequency": "Day", "interval": 1 }, "name": "Activity-Opportunity" } ], "start": "2017-04-17T19:48:55.667Z", "end": "2099-12-31T05:00:00Z", "isPaused": false, "pipelineMode": "Scheduled" }, } Getting your new JSON scripts to execute on demand is another blog post. Hint: Your "start" UTC time of your pipeline controls this! Download all JSON scripts below. Enjoy!
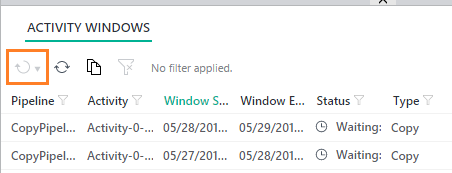
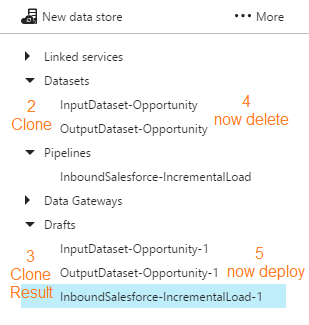
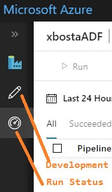
One of the challenges of ADF is getting a pipeline to run demand. I am told by Microsoft that the next version of ADF coming fall 2017 will include this functionality, but right now, there is no <Run Now!> button to be found. Granted, you will find a rerun button in the ADF Monitor Console (orange box below) ... ... but this button is only enabled for failed pipelines. What about during development? Those of us coming from SSIS expect <execute> now functionality, but with ADF, there is no such thing because the pipeline is tied to the job schedule. This is when I remind myself that just because something is different, it doesn't make it wrong. Okay, so let's work with what we have. First an assumption: We do not want to have to use a custom .NET activity, PowerShell command, or Azure job scheduler. The scenario is development mode and all we want to do is test to see if our new datasets and pipeline are producing the desired result. Second, recall that in order for an activity to run on demand, ADF compares the "start" property of the pipeline to the last run DateTime of each dataset and there is no way to remove dataset execution history. Consequently, there are two ways to start a non-failed pipeline on demand: 1. Clone, delete and redeploy the datasets used in the pipeline. 2. Change the "start" property of pipeline to an earlier point in time Option #1: Clone, delete and redeploy the datasets The first thing you will run into is dependencies. This isn't a big deal if your pipeline only has one set of input/output datasets. However, when you are working with a pipeline containing a plethora of tables or files, this becomes a time consuming and outright ridiculous option. 1. Navigate to Azure Data Factory Author and Deploy action 2. Select each input and output dataset used in the pipeline 3. Click <Clone> 4. Right mouse click on each dataset you just cloned and <delete> 5. From the set of Drafts created in step #3, click <deploy> Be aware of "start", "end" and "pipelineMode" pipeline properties before you redeploy. The pipeline "start" is UTC time and must be the current UTC DateTime or a DateTime in the past, or the pipeline won't start. If you have cloned a paused pipeline, you will also need to change the "pipelineMode" property to "Scheduled".
As a matter of habit, I clone, delete and redeploy both my datasets and my pipeline to remove all internal run history. You could change the activity properties of a pipeline and then just clone, delete and redeploy your input datasets, but that seems more complicated to me. For pipeline that have a limited number of activities, the clone, delete and redeploy goes pretty quick and produces the desired result: a running pipeline! Disclaimer: This is a DEV solution. If you are in PROD you will over-write existing files and folders!! Option #2: Change the "start" property of the pipeline If all your datasets are in step with each other (all have the same execution history), you can also get the activities of a pipeline to run on demand by updating the "start" property of the pipeline to a prior point in time. This will cause ADF to "backfill" the destination creating new destination files or folders for this same earlier point in time. On a full data load (a pipeline that does use a WHERE LastModified DateTime > [x]) the resulting destination files will be a duplicate of a later point in time, but at the moment, we are in DEV and are just trying to test out the input, output and resulting destination result. If you are in PROD, be very careful. Because you have not deleted anything, source files, folders or tables will not get overwritten, but you may have just caused issues for an ETL process. Disclaimer: This option has worked for me except when my pipeline has activities referencing datasets that have different execution histories. I've looked at my new (earlier) destination location and have had missing files because there has been datasets with execution histories since the dawn of time. I just had the pleasure of deleting in my blog backlog, three ADFv1 blog posts in the making. The arrival of Azure Data Factory v2 (ADFv2) makes me want to stand up and sing Handel's Hallelujah Chorus. Yes, my fine friend, ADFv2 is a real game player now. Let us begin! Assumptions:
Summary: This blog post will give you examples of the following ADFv2 functionality
Setup To get "this extract start time" we obviously have to incorporate a metadata layer in our solution. ADFv2 can now Lookup to Cosmos DB as well as several other data sources listed here, but I'm an old fashioned SQL Server lady and I prefer to use an Azure Database for things like this. It doesn't hurt to keep tables and procs, like what is included in the sample t-sql file at the end of this post, in an Azure Data Warehouse, but honestly, replicated 60 times? If you can afford it, stand up a simple Azure SQL Database for metadata collection. Step #1: Create your ADFv2 control objects in your metadata SQL database
Step #2: Create your three ADFv2 linked services (data connections)
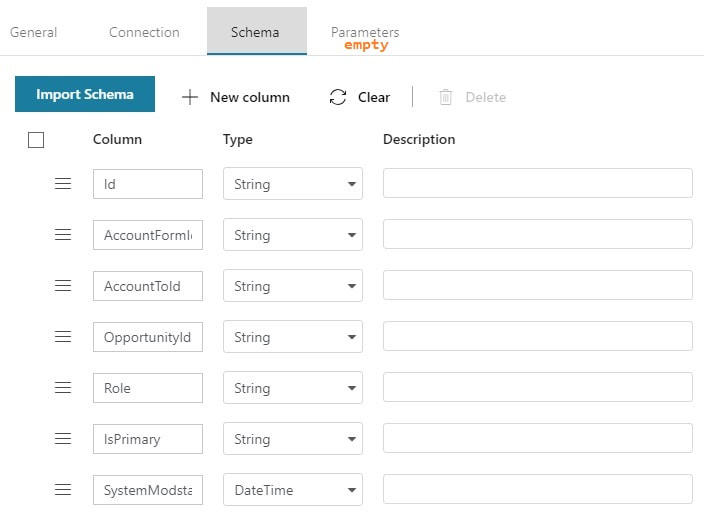
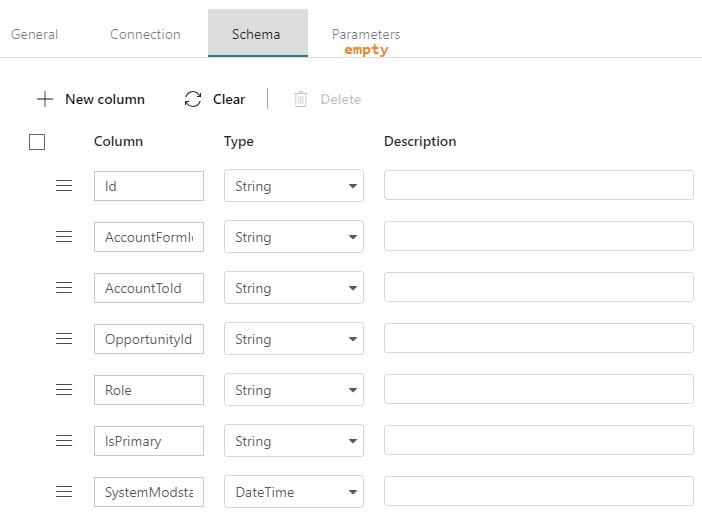
Step #3: Create your ADFv2 datasets I am going to show you screen prints here, but the JSON for these datasets is provided at the end of this blog post. This blog post uses a hard-coded table name. In blog post 2 of 3, I'll show you how to use a single input and output dataset to extract all tables from a single source. metadata DB used for all objects Your lookup and execute SQL tasks will use this same dataset. input dataset for your source This is your source dataset. You actually do not need to define every column, but we'll tackle that later. output dataset for your destination This is your destination dataset definition. You actually do not need to define every column here either, but more on that later.
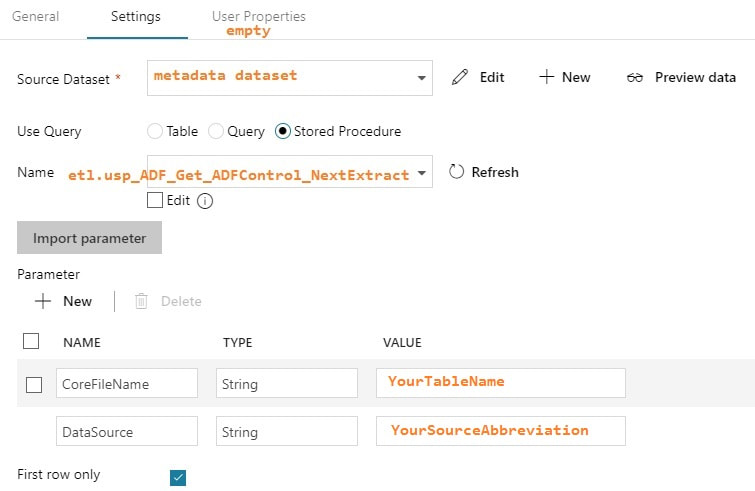
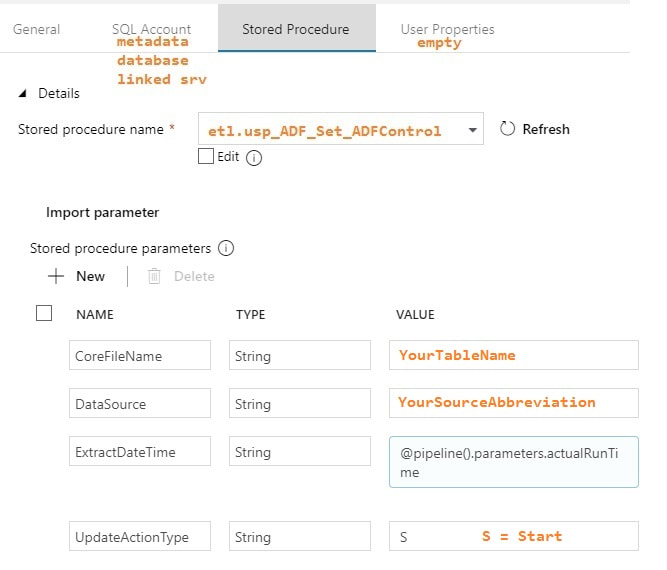
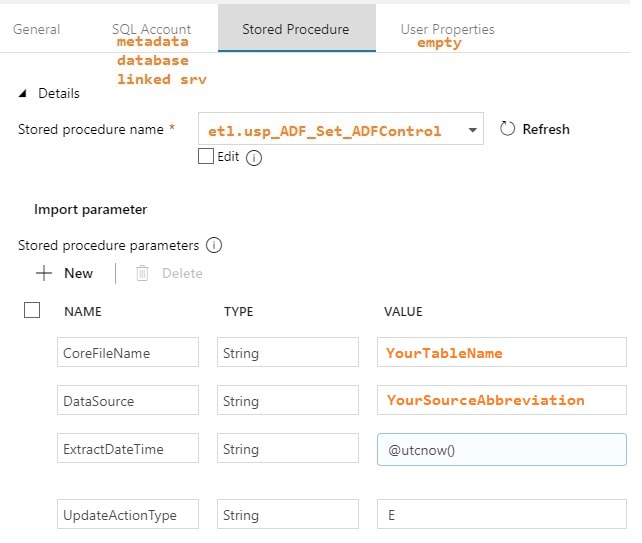
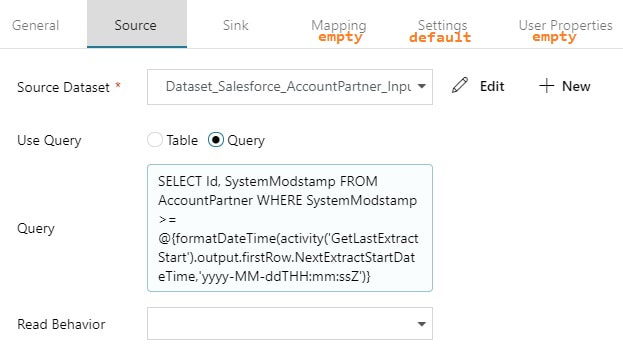
You may be thinking, "This is a lot of stuff to just import one table!" but stay tuned. I promise you, you will have less development time, cost of ownership, and less downtime by moving data with ADFv2 then you would with SSIS packages especially if you have > 2GB of data in a source object. Using parameters is the key to success. Step #4: Create your ADFv2 pipeline Lookup Activity: GetLastExtractStart Stored Procedure Activities: Set Start and End Dates Copy Activity: The actual copy data from source to destination filtered by YourSource.LastModifiedDate If you are new to ADFv2, here are a couple of screen prints on how to validate, save, publish and run your pipeline on demand. Conclusion of the Matter This blog post is intended for developers just starting out in ADFv2, and especially for ADFv2 developers pulling Salesforce data. I do not expect you to have needed all the information provided, but I am hoping you'll find a tip or trick that will save you time. Referencing activities and pipeline parameters is easy to do, for example, but when I first worked on this, I found very few examples. Finding the right syntax for a Salesforce date filter took me about a week. You may be frustrated transitioning from SSIS to ADFv2, but don't give up. Remember that ADFv2 is not a data transformation tool -- it is a data copy tool. SSIS <> ADFv2, and in a world where we are moving to MPP architectures and ELT via stored procedures, ADFv2 as an "orchestrator" is worth considering. Supporting Downloadable Files
Azure Data Factory (ADFv1) JSON Example for Salesforce Incremental Load of RelationalSource Pipeline4/25/2017 What I am sharing in this blob post isn't rocket science, but when I first began working with ADF, I would have had genuine feelings of gratitude if I could have found a JSON script example for incremental loads. Consequently, this blog post is here in hopes that it finds someone who just needs a quick pick-me-up with ADF.
You will want to first reference my blog post on initial data loads with ADF because I will build here on the same resources and linked services. What is different is the pipeline JSON script. Follow the instructions for initial data load for everything else. Using the Account table from Salesforce as an example, here is what I call an incremental load pipeline: { "name": "InboundPipeline-SalesforceIncrementalLoad", "properties": { "activities": [ { "type": "Copy", "typeProperties": { "source": { "type": "RelationalSource", "query": "$$Text.Format('select * from Account where LastModifiedDate >= {{ts\\'{0:yyyy-MM-dd HH:mm:ss}\\'}} AND LastModifiedDate < {{ts\\'{1:yyyy-MM-dd HH:mm:ss}\\'}}', WindowStart, WindowEnd)" }, "sink": { "type": "AzureDataLakeStoreSink", "writeBatchSize": 0, "writeBatchTimeout": "00:00:00" } }, "inputs": [ { "name": "InputDataset-Account" } ], "outputs": [ { "name": "OutputDataset-Account" } ], "policy": { "timeout": "1.00:00:00", "concurrency": 1, "executionPriorityOrder": "NewestFirst", "style": "StartOfInterval", "retry": 3, "longRetry": 0, "longRetryInterval": "00:00:00" }, "scheduler": { "frequency": "Day", "interval": 1 }, "name": "Activity-Account" } ], "start": "2017-04-17T19:48:55.667Z", "end": "2099-12-31T05:00:00Z", "isPaused": false, "pipelineMode": "Scheduled" }, } Unfortunately at this time, the "query" property isn't that flexible. I have been told by Microsoft that the next version of ADF scheduled for release fall 2017 will include input parameters. I have tested and was able to use a REPLACE() function in the above SELECT but that is because under the covers, Microsoft is using the Simba ODBC driver for their Salesforce connection. Each data source will have different capabilities within their "SELECT..." Having identified several challenges with the current version of ADF, I was just happy to be able to use a WHERE clause. |
|||||||||||||||||||||||||||||||||||||||||||||||||||
| Microsoft Data & AI | All Things Azure |









 RSS Feed
