SQL Server Profiler vs Extended Events for Analysis Services (SSAS) 2016 Database Administration.3/6/2017 I recently taught a live webinar for Pragmatic Works on SSAS Monitoring and Performance Tuning with Extended Events. It is worth noting that Profiler is still available to us in SQL Server 2016, and continues to provide benefits that Extended Events do not. This is how I see it. SQL Server Profiler 2016 1. This very fine SQL Server tool is being deprecated by Microsoft in a later version as stated on MDSN here. The good news is that Profiler is not deprecated quite yet. Hooray! 2. This is still the fastest way to log SSAS query activity for immediate analysis. You do not need to write out to a file, view said file, and import. SQL Profiler provides a very handy viewing tool that is real time. When needing to complete a one-off monitoring of a problematic query, SSIS package or SSRS report, this is the low hanging fruit. 3. Granted, Profiler has a heavier "footprint" than Extended Events (i.e. it takes more system resources). Coupled with the fact that it is going away ... eventually ... it should not be considered as a long-term monitoring tool of choice. When I say "long term monitoring" I am referring to scheduling monitoring through a SSIS package. 4. When working with Profiler and SSAS, it is important to Show All Properties on the Events Selection tab of the Trace Properties window and mark relevant SSAS events. Not all SSAS events are marked by default when connecting to a SSAS instance and taking the default SSAS trace. The list of tabular and multidimensional events I use most often is given below. Extended Events (EE) in SQL Server 2016 1. It is sometimes misunderstood, but EE is not a new SQL 2016 SSAS feature. You could use XMLA in earlier SQL Server versions. Chris Webb has a very good BI Blog post here that talks about doing this very thing in SQL 2012. 2. What is new in SQL 2016 is the user interface for creating SSAS EE sessions. Unfortunately, I feel that Microsoft did a half-hearted effort in this, and that is the politically correct way of saying it. In a SSAS instance, you can create EE sessions, but you cannot edit them. For real? The solution is to use the GUI to setup the session, then be sure to script it out before you save it. 3. When working with EE for SSAS, I recommend you use a XMLA query in SQL Server Management Studio (SSMS). Attached to this post is the XMLA for creatings, stopping, deleting and querying current EE sessions for both tabular models and multidimensional cubes. 4. If using EE to warm your SSAS multidimensional cube cache, or to monitor user query durations and execution counts, EE and SSIS is definitely the best solution. Use a SSIS package on a scheduled job to automatically stop, import and restart EE sessions. Use t-sql against the resulting SQL Server database table, and SSRS to automatically report long running queries. Profile Trace / Extended Events SSAS Events: This is not a complete listing, but these are the events that I find most helpful when monitoring SSAS. Multidimensional ExecuteMDXScriptEnd GetDataFromAggregations GetDataFromCache ProgressReportEnd QueryCubeEnd QueryEnd QuerySubcube QuerySubcubeVerbose Tabular DAXQueryPlan QueryCubeEnd QueryEnd QueryExceedsMemoryLimit VertiPaqSEQueryEnd (using the VertiPaq Scan subclass event) XMLA File Downloads
1 Comment
To prove out SQL Server’s columnstore capabilities, I wanted to set up my own POC (proof of concept). I found, however, that to do this, I needed a more fundamental understanding of how and when SQL Server actually took advantage of the benefits of columnstore. So having worked through this for myself, I thought I’d document my Columnstore POC for you. The purpose of the article is to help you setup your own POC so you can test this out for yourself with your own data – the intent is not to explain columnstore in general. First, to setup your POC, make sure your data store and t-SQL meet these qualifications: 1. Have at least one FACT table with at least 100 million rows. I setup the following: a. Four fact tables with identical values with 100.2 million rows each § A heap table with no indexes or keys – created for the sake of example § An indexed table with a clustered PK, but no columnstore – a common SQL 2008 R2 data warehouse scenario § A non-clustered columnstore indexed table which included all columns – a SQL 2012 scenario § A clustered columnstore indexed table which included all columns – a SQL 2014 scenario b. One degenerate dimension table containing a clustered PK. This table had a 1-1 relationship with my fact table. c. Two dimension tables containing a clustered PK, one being a date or calendar table. In the end, my table list was as follows … 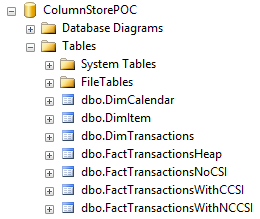 NoCSI = No clustered columnstore index (clustered PK) WithCCSI = With clustered columnstore index (no PK) WithNCCSI = With non-clustered columnstore index (no PK) … and my indexes were as follows: 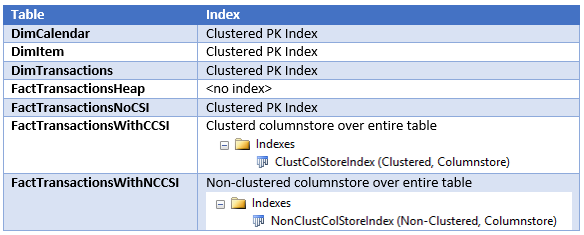 2. Understand that a clustered Columnstore index is the primary storage for the entire table. A nonclustered Columnstore (NCCS) index is a secondary index. A table with a NCCS is actually a rowstore table and the index is a copy of the rows and columns in the table. 3. Model your POC in a proper star schema using integer data types for PKs and SKs etc. 4. To test Columnstore, your t-sql must use an aggregate, like SUM() or COUNT(), a GROUP BY and preferably an ORDER BY 5. To test segment elimination, use a WHERE clause that will pull back only a subset of data 6. To take advantage of batch mode query processing, your t-SQL should use INNER JOINS, not LEFT OUTER or OUTER joins. This was true in SQL Server 2012. I could not replicate the ‘Row’ Actual Execution Mode in SQL Server 2014. 7. This might seem obvious, but make sure you are working in the SQL server 2014 version of SSMS (SQL Server Management Studio). You can actually create a clustered Columnstore index in SQL 2012 SSMS on a table stored on a SQL 2014 instance, but it just gets confusing because the SQL 2012 GUI won’t visually indicate it. When you think you are ready to go, double check your table design and data by running some system views. 1. Verify that Columnstore indexes really exist. SELECT distinct t.name FROM sys.column_store_row_groups csrg LEFT JOIN sys.tables t on csrg.object_id = t.object_id 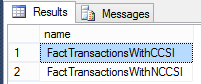 2. Verify that your fact tables contain the same number of rows. You can do this a couple of ways. a. Script to select table metadata SELECT tbl_ObjectID = t.object_id ,tbl_SchemaName = s.name ,tbl_TableName = t.name ,tbl_TableType = t.type ,tbl_TableTypeDescr = t.type_desc ,tbl_DateCreated = create_date ,tbl_RowCount = si.rowcnt ,tbl_ColumnCount = c.ColumnCount FROM sys.tables t WITH (NOLOCK) LEFT JOIN sys.schemas s WITH (NOLOCK) on t.schema_id = s.schema_id LEFT JOIN sys.sysindexes si WITH (NOLOCK) on t.object_id = si.id AND si.indid < 2 LEFT JOIN (SELECT object_id, COUNT(*) as ColumnCount from sys.columns c group by c.object_id) c on t.object_id = c.object_id b. Script to get space used exec sp_spaceused '[dbo].[FactTransactionsHeap]', true; exec sp_spaceused '[dbo].[FactTransactionsNoCSI]', true; exec sp_spaceused '[dbo].[FactTransactionsWithCCSI]', true; exec sp_spaceused '[dbo].[FactTransactionsWithNCCSI]', true; Before we start testing for query performance, also take a look at the space used. It should come as no surprise that the clustered columnstore table uses 32% less space than the other tables. 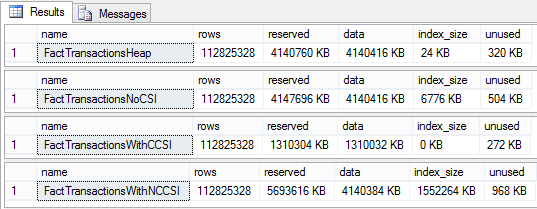 You can read about sp_spaceused on MSDN here (https://msdn.microsoft.com/en-us/library/ms188776.aspx), but a brief explanation is as follows: · Reserved is the total amount of space allocated by objects in the database · Data is the total amount of space used by data · Index_size is the total amount of space used by index · Unused is the total amount of space reserved for objects in the database, but not yet used. Nicely formatted, our test data looks like this: 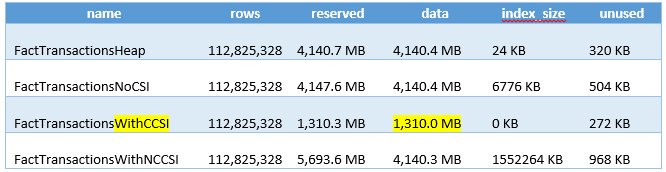 Now for the good stuff! Let’s write a typical OLAP query and run it against each fact table recording execution times. SET STATISTICS TIME ON GO SELECT c.cal_Year ,i.itm_Code ,SUM(trn_NetAmt) as SumOfNetAmt FROM dbo.FactTransactionsHeap t --dbo.FactTransactionsNoCSI t --dbo.FactTransactionsWithCCSI t --dbo.FactTransactionsWithNCCSI t INNER JOIN dbo.DimCalendar c on t.trn_TransDateSK = c.cal_DateIntPK INNER JOIN dbo.DimITem i on t.trn_ItemSK = i.itm_PK GROUP BY c.cal_Year, i.itm_Code ORDER BY i.itm_Code, c.cal_Year Returning 177,099 aggregated rows, these were my execution times:  Before moving on to add a WHERE clause, let’s take a look at our query execution plans. As expected, our heap table used a table scan. 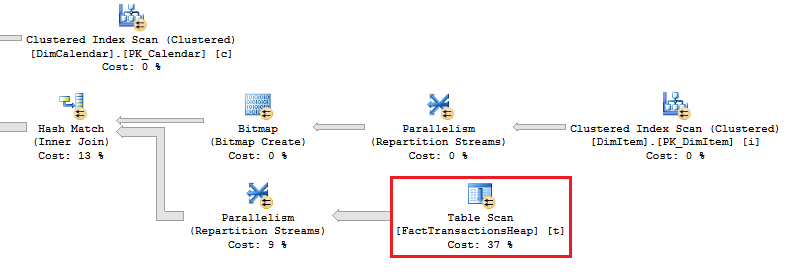 Our table with only a clustered PK (our SQL 2008 R2 scenario) used a clustered index scan. 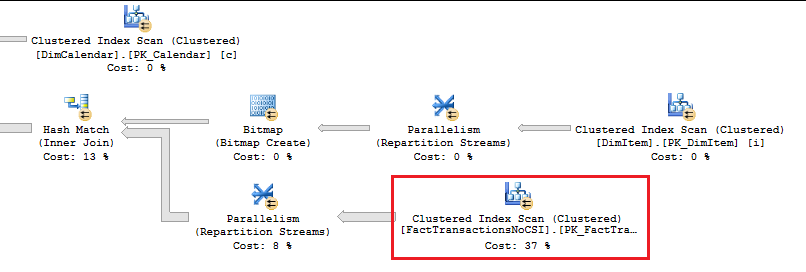 Our table with a non-clustered Columnstore index (our SQL 2012 scenario) used a Columnstore index scan. 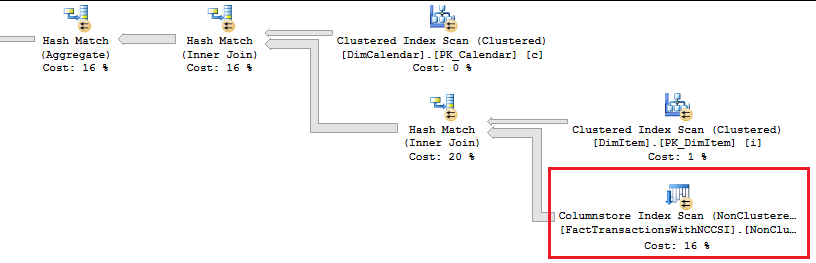 We have almost identical results with our clustered Columnstore indexed table (our SQL 2014 scenario). 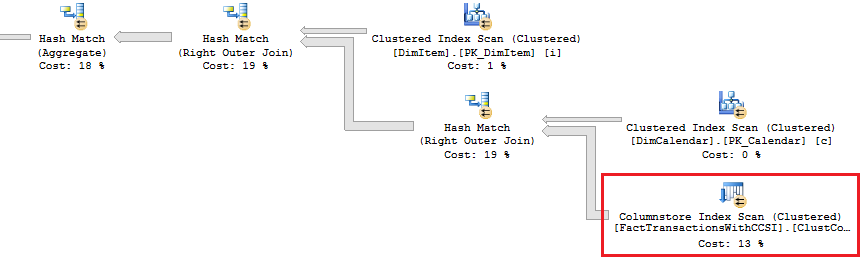 Let’s take this one step further. Hover your mouse over your Columnstore Index Scan operator. If your query is optimized, your Actual Execution Mode should say ‘Batch’.  This is a fundamental principle of query performance. You want SQL Server to use ‘Batch’ mode vs ‘Row’ mode as much as possible. If you look under your Heap or NoCSI scan operators, you will see that they are using a ‘Row’ Actual Execution Mode … and therefore they take longer to execute. Okay, now let’s add a WHERE clause as 99% of the OLAP queries I have seen want to filter or slice on some sort of date value. We should also talk about segment elimination, which you can read up from TechNet here --> (http://social.technet.microsoft.com/wiki/contents/articles/5651.understanding-segment-elimination.aspx). The short version is SQL Server segments columnstore columns in groups of roughly 1 million rows. Metadata associated with each segment exposes a MAX and MIN value of each segment. So when you filter on DimDate.DateKey between [x] and [y], SQL Server will look at the segment metadata and automatically skip past those segments that do not contain qualifying column values. An example of how to verify columnstore segment elimination can be found here --> (http://social.technet.microsoft.com/wiki/contents/articles/5611.verifying-Columnstore-segment-elimination.aspx) but for our purposes, let’s have an element of trust and look at our execution results from a filtered query. First, let’s take a look to see what we have to work with. 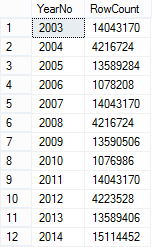 Next, let’s build a query. SELECT c.cal_Year ,i.itm_Code ,SUM(trn_NetAmt) as SumOfNetAmt FROM --dbo.FactTransactionsHeap t --dbo.FactTransactionsNoCSI t dbo.FactTransactionsWithCCSI t --dbo.FactTransactionsWithNCCSI t INNER JOIN dbo.DimCalendar c on t.trn_TransDateSK = c.cal_DateIntPK INNER JOIN dbo.DimITem i on t.trn_ItemSK = i.itm_PK WHERE t.trn_TransDateSK Between 20060101 and 20121231 GROUP BY c.cal_Year, i.itm_Code ORDER BY i.itm_Code, c.cal_Year Returning 93,469 aggregated rows, these were my execution times:  A quick note about our ‘Heap’ table and the ‘NoCSI’ table which contained a clustered primary key. How many times have you heard the phrase “index lite”? We have a clustered PK on our FactTransactionsNoCSI and our one-to-one degenerate dimension DimTransactions to support that relationship, but notice how the ‘Heap’ table actually had better query performance. It is only fair that we take a minute to demo a couple of anti-performance practices given to TechNet’s SQL Server Columnstore Performance Tuning article found here --> (http://social.technet.microsoft.com/wiki/contents/articles/4995.sql-server-Columnstore-performance-tuning.aspx) 1. String Filters 2. OUTER JOINS 3. Joining to an equally large DegenerateDim table that does not have a columnstore index Here is our t-SQL where we are just wanting OPEN status transactions SELECT c.cal_Year ,i.itm_Code ,SUM(trn_NetAmt) as SumOfNetAmt FROM dbo.FactTransactionsWithCCSI t INNER JOIN dbo.DimCalendar c on t.trn_TransDateSK = c.cal_DateIntPK INNER JOIN dbo.DimITem i on t.trn_ItemSK = i.itm_PK INNER JOIN dbo.DimTransactions dt on t.trn_PK = dt.trn_PK WHERE t.trn_TransDateSK Between 20060101 and 20121231 and dt.trn_StatusCode <> 'CLOSED' GROUP BY c.cal_Year, i.itm_Code ORDER BY i.itm_Code, c.cal_Year Here is our query execution plan where our filter cost is 86% of our total execution time. Note the ‘Row’ Actual Execution Mode. 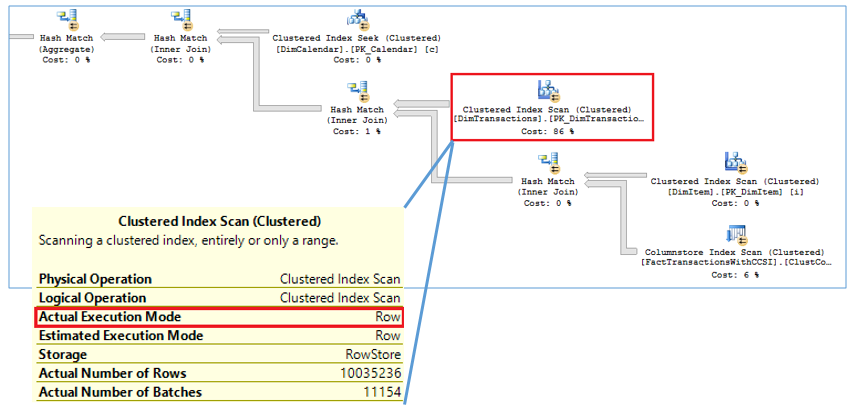 The case can be made that this is expected behavior and not the fault of our fact table columnstore index, and that is correct as we are filtering on DimTransactions which does not have a columnstore. Let’s put a columnstore index on DimTransaction as it does have as many rows as our fact table, and see what happens. CREATE TABLE [dbo].[DimTransactionsWithCCSI]( [trn_PK] [int] NOT NULL, [trn_No] [int] NOT NULL, [trn_SeqNo] [int] NOT NULL, [trn_SourceCode] [varchar](50) NOT NULL, [trn_RouteCode] [varchar](50) NULL, [trn_StatusCode] [varchar](50) NULL, ) ON [PRIMARY] GO insert dbo.DimTransactionsWithCCSI select * from dbo.DimTransactions create clustered Columnstore index dtClustColStoreIndex ON dbo.DimTransactionsWithCCSI go SELECT c.cal_Year ,i.itm_Code ,SUM(trn_NetAmt) as SumOfNetAmt FROM dbo.FactTransactionsWithCCSI t INNER JOIN dbo.DimCalendar c on t.trn_TransDateSK = c.cal_DateIntPK INNER JOIN dbo.DimITem i on t.trn_ItemSK = i.itm_PK INNER JOIN dbo.DimTransactionsWithCCSI dt on t.trn_PK = dt.trn_PK WHERE t.trn_TransDateSK Between 20060101 and 20121231 and dt.trn_StatusCode <> 'CLOSED' GROUP BY c.cal_Year, i.itm_Code ORDER BY i.itm_Code, c.cal_Year The result is that DimTransaction now has a CCSI. Consequently, we now have a 'bach' Actual Execution Mode for DimTransaction vs 'Row' and our query is off and flying! 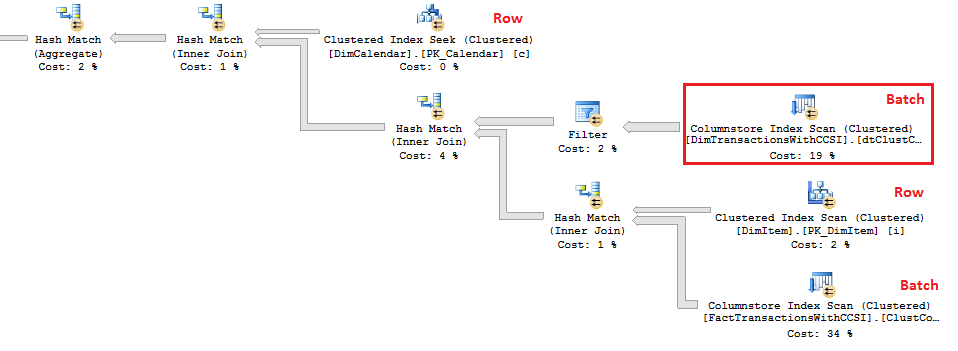 Change the INNER JOINS to LEFT OUTER JOINS. SELECT c.cal_Year ,i.itm_Code ,SUM(trn_NetAmt) as SumOfNetAmt FROM dbo.FactTransactionsWithCCSI t LEFT OUTER JOIN dbo.DimCalendar c on t.trn_TransDateSK = c.cal_DateIntPK LEFT OUTER JOIN dbo.DimITem i on t.trn_ItemSK = i.itm_PK LEFT OUTER JOIN dbo.DimTransactionsWithCCSI dt on t.trn_PK = dt.trn_PK WHERE t.trn_TransDateSK Between 20060101 and 20121231 and dt.trn_StatusCode <> 'CLOSED' GROUP BY c.cal_Year, i.itm_Code ORDER BY i.itm_Code, c.cal_Year The result in SQL 2014 is that my LEFT OUTER joins still used ‘batch’ Actual Execution Mode and SQL Server is even aware enough to turn the one-to-one relationship between DimTrans and FactTrans into an INNER join. 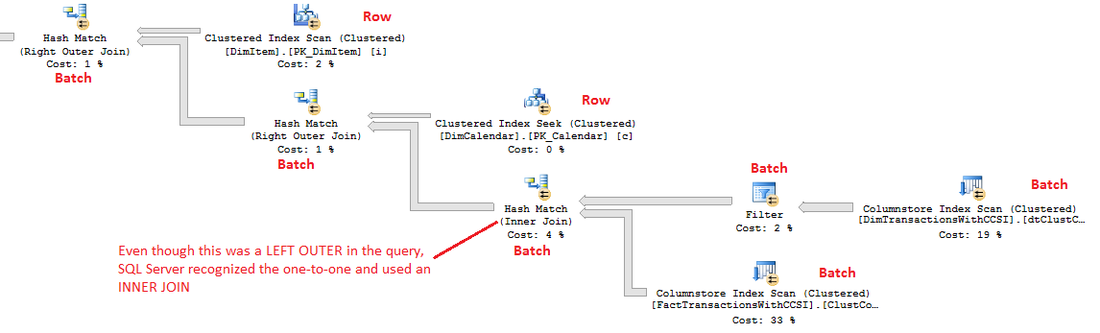 In summary,
1. With each new version of SQL Server, Columnstore is going to enhance, so do not assume that all prior guidelines and best practices remain the same. 2. Columnstore indexes do work and if you are running Enterprise edition, take advantage of them! 3. They are intended for OLAP environments primarily. 4. Executing “Select * FROM MyColumnstoreIndexedTable” will not show you the benefits. You have to aggregate some data, group, order and filter which is the exact scenario of data warehousing queries. 5. You’ll only see significant benefits of Columnstore when working with large data volumes. 6. Once again, Columnstore just like SSAS, will produce the best results when working with star schema data models. Please remember that the purpose of this documentation is not to explain columnstore, but to help you put together a POC and prove out the capabilities of columnstore indexes. A blog site that I feel goes above and beyond for columnstore documentation is Niko Neugebauer and can be found here (http://www.nikoport.com/Columnstore/). Niko’s site has 56 tips and tricks for columnstore. Enjoy! I was asked today for help with defaulting SSRS report date parameters. In response I am sharing this snippet of t-SQL that I put together back in 2008 (yes, seven years ago!), but that still works today. Certainly you can do these date calculations in MDX and DAX, but how easy is this? Having these values return in a UDF (user defined function) also allows you to easily consume this logic in USPs (user stored procedures) for complex business calculations. Inserted below is a correctly formatted *.sql file for download. USE [YourDatabaseName] GO SET ANSI_NULLS ON GO SET QUOTED_IDENTIFIER ON GO /* Author: Delora Bradish Date Created: February 22, 2008 Description: Get date comparisons Where Used: SSRS Report defaults Notes: To Run: SELECT * FROM fnGetDateRanges ('2/29/2012') SELECT * FROM fnGetDateRanges (GetDate()) SELECT top 10 * FROM dbo.Invoice i WHERE i.inv_DateInvoice Between (SELECT FirstDayPriorMonth3 FROM fnGetDateRanges(GetDate())) and GetDate() Revision History: */ CREATE FUNCTION [dbo].[fnGetDateRanges] (@i_Date DateTime) RETURNS table AS RETURN ( SELECT @i_Date as iDate , CurrentDate = Convert(DateTime,Convert(varchar(8),@i_Date,112),1) , CurrentDay = Day(@i_Date) , CurrentWeek = DatePart(Week, @i_Date) , CurrentMonth = Month(@i_Date) , CurrentYearMonth = Convert(int,Convert(char(4),Year(@i_Date)) + RIGHT(RTrim('00' + Convert(char(2),Month(@i_Date))),2)) , PriorDay1 = Convert(DateTime,Convert(varchar(8),@i_Date -1,112),1) , PriorWeek = DatePart(Week, @i_Date - 7) , PriorMonth = DatePart(mm,dateadd(day,(day(@i_date)-1)*-1,dateadd(month,-1,@i_date))) --you may want to trap for leap years here , PriorYear1 = DatePart(yy, @i_Date - 365) , PriorYear2 = DatePart(yy, @i_Date - 730) , PriorYear3 = DatePart(yy, @i_Date - 1086) , PriorYear4 = DatePart(yy, @i_Date - 1451) , PriorYear5 = DatePart(yy, @i_Date - 1816) , PriorYear6 = DatePart(yy, @i_Date - 2181) , SameDayLastYear = CASE WHEN Right(Convert(char(8),@i_Date,112),4) = '0229' THEN @i_Date - 366 ELSE @i_Date - 365 END , FirstDayCurrentMonth = DATEADD(mm, DATEDIFF(mm, 0, @i_Date), 0) , FirstDayCurrentWeek = DATEADD(ww, DATEDIFF(ww, 0, @i_Date), 0) , FirstDayCurrentYear = DATEADD(yy, DATEDIFF(yy, 0, @i_Date), 0) , LastDayCurrentMonth = dateadd(mm, datediff(mm, 0, dateadd(mm, 1, @i_date)), -1) , LastDayCurrentWeek = dateadd(ww, datediff(ww, 0, dateadd(ww, 1, @i_date)), -1) , LastDayCurrentYear = dateadd(yy, datediff(yy, 0, dateadd(yy, 1, @i_date)), -1) , FirstDayPriorMonth1 = Convert(Date,Convert(varchar(2),Month(DateAdd(month,-1,@i_Date)))+ '/1/' + Convert(char(4),Year(DateAdd(month,-1,@i_Date)))) , FirstDayPriorMonth2 = Convert(Date,Convert(varchar(2),Month(DateAdd(month,-2,@i_Date)))+ '/1/' + Convert(char(4),Year(DateAdd(month,-2,@i_Date)))) , FirstDayPriorMonth3 = Convert(Date,Convert(varchar(2),Month(DateAdd(month,-3,@i_Date)))+ '/1/' + Convert(char(4),Year(DateAdd(month,-3,@i_Date)))) , FirstDayPriorMonth4 = Convert(Date,Convert(varchar(2),Month(DateAdd(month,-4,@i_Date)))+ '/1/' + Convert(char(4),Year(DateAdd(month,-4,@i_Date)))) , FirstDayPriorMonth5 = Convert(Date,Convert(varchar(2),Month(DateAdd(month,-5,@i_Date)))+ '/1/' + Convert(char(4),Year(DateAdd(month,-5,@i_Date)))) , FirstDayPriorMonth6 = Convert(Date,Convert(varchar(2),Month(DateAdd(month,-6,@i_Date)))+ '/1/' + Convert(char(4),Year(DateAdd(month,-6,@i_Date)))) , FirstDayPriorMonth7 = Convert(Date,Convert(varchar(2),Month(DateAdd(month,-7,@i_Date)))+ '/1/' + Convert(char(4),Year(DateAdd(month,-7,@i_Date)))) , FirstDayPriorMonth8 = Convert(Date,Convert(varchar(2),Month(DateAdd(month,-8,@i_Date)))+ '/1/' + Convert(char(4),Year(DateAdd(month,-8,@i_Date)))) , FirstDayPriorMonth0 = Convert(Date,Convert(varchar(2),Month(DateAdd(month,-9,@i_Date)))+ '/1/' + Convert(char(4),Year(DateAdd(month,-9,@i_Date)))) , FirstDayPriorMonth10 = Convert(Date,Convert(varchar(2),Month(DateAdd(month,-10,@i_Date)))+ '/1/' + Convert(char(4),Year(DateAdd(month,-10,@i_Date)))) , FirstDayPriorMonth11 = Convert(Date,Convert(varchar(2),Month(DateAdd(month,-11,@i_Date)))+ '/1/' + Convert(char(4),Year(DateAdd(month,-11,@i_Date)))) , FirstDayPriorMonth12 = Convert(Date,Convert(varchar(2),Month(DateAdd(month,-12,@i_Date)))+ '/1/' + Convert(char(4),Year(DateAdd(month,-12,@i_Date)))) , FirstDayPriorMonth13 = Convert(Date,Convert(varchar(2),Month(DateAdd(month,-13,@i_Date)))+ '/1/' + Convert(char(4),Year(DateAdd(month,-13,@i_Date)))) --this is the prior YYYYMM from the date passed, not the prior year's month number , PriorMonth1 = Month(DateAdd(month,-1,@i_Date)) , PriorMonth2 = Month(DateAdd(month,-2,@i_Date)) , PriorMonth3 = Month(DateAdd(month,-3,@i_Date)) , PriorMonth4 = Month(DateAdd(month,-4,@i_Date)) , PriorMonth5 = Month(DateAdd(month,-5,@i_Date)) , PriorMonth6 = Month(DateAdd(month,-6,@i_Date)) , PriorMonth7 = Month(DateAdd(month,-7,@i_Date)) , PriorMonth8 = Month(DateAdd(month,-8,@i_Date)) , PriorMonth9 = Month(DateAdd(month,-9,@i_Date)) , PriorMonth10 = Month(DateAdd(month,-10,@i_Date)) , PriorMonth11 = Month(DateAdd(month,-11,@i_Date)) , PriorMonth12 = Month(DateAdd(month,-12,@i_Date)) , PriorMonth13 = Month(DateAdd(month,-13,@i_Date)) , PriorYearMonth1 = Convert(int,Convert(char(4),Year(DateAdd(month,-1,@i_Date))) + RIGHT(RTrim('00' + Convert(char(2),Month(DateAdd(month,-1,@i_Date)))),2)) , PriorYearMonth2 = Convert(int,Convert(char(4),Year(DateAdd(month,-2,@i_Date))) + RIGHT(RTrim('00' + Convert(char(2),Month(DateAdd(month,-2,@i_Date)))),2)) , PriorYearMonth3 = Convert(int,Convert(char(4),Year(DateAdd(month,-3,@i_Date))) + RIGHT(RTrim('00' + Convert(char(2),Month(DateAdd(month,-3,@i_Date)))),2)) , PriorYearMonth4 = Convert(int,Convert(char(4),Year(DateAdd(month,-4,@i_Date))) + RIGHT(RTrim('00' + Convert(char(2),Month(DateAdd(month,-4,@i_Date)))),2)) , PriorYearMonth5 = Convert(int,Convert(char(4),Year(DateAdd(month,-5,@i_Date))) + RIGHT(RTrim('00' + Convert(char(2),Month(DateAdd(month,-5,@i_Date)))),2)) , PriorYearMonth6 = Convert(int,Convert(char(4),Year(DateAdd(month,-6,@i_Date))) + RIGHT(RTrim('00' + Convert(char(2),Month(DateAdd(month,-6,@i_Date)))),2)) , PriorYearMonth7 = Convert(int,Convert(char(4),Year(DateAdd(month,-7,@i_Date))) + RIGHT(RTrim('00' + Convert(char(2),Month(DateAdd(month,-7,@i_Date)))),2)) , PriorYearMonth8 = Convert(int,Convert(char(4),Year(DateAdd(month,-8,@i_Date))) + RIGHT(RTrim('00' + Convert(char(2),Month(DateAdd(month,-8,@i_Date)))),2)) , PriorYearMonth9 = Convert(int,Convert(char(4),Year(DateAdd(month,-9,@i_Date))) + RIGHT(RTrim('00' + Convert(char(2),Month(DateAdd(month,-9,@i_Date)))),2)) , PriorYearMonth10 = Convert(int,Convert(char(4),Year(DateAdd(month,-10,@i_Date))) + RIGHT(RTrim('00' + Convert(char(2),Month(DateAdd(month,-10,@i_Date)))),2)) , PriorYearMonth11 = Convert(int,Convert(char(4),Year(DateAdd(month,-11,@i_Date))) + RIGHT(RTrim('00' + Convert(char(2),Month(DateAdd(month,-11,@i_Date)))),2)) , PriorYearMonth12 = Convert(int,Convert(char(4),Year(DateAdd(month,-12,@i_Date))) + RIGHT(RTrim('00' + Convert(char(2),Month(DateAdd(month,-12,@i_Date)))),2)) , PriorYearMonth13 = Convert(int,Convert(char(4),Year(DateAdd(month,-13,@i_Date))) + RIGHT(RTrim('00' + Convert(char(2),Month(DateAdd(month,-13,@i_Date)))),2)) --this is the next YYYYMM from the date past, not next year's month number , NextYearMonth1 = Convert(int,Convert(char(4),Year(DateAdd(month,+1,@i_Date))) + RIGHT(RTrim('00' + Convert(char(2),Month(DateAdd(month,+1,@i_Date)))),2)) , NextYearMonth2 = Convert(int,Convert(char(4),Year(DateAdd(month,+2,@i_Date))) + RIGHT(RTrim('00' + Convert(char(2),Month(DateAdd(month,+2,@i_Date)))),2)) , NextYearMonth3 = Convert(int,Convert(char(4),Year(DateAdd(month,+3,@i_Date))) + RIGHT(RTrim('00' + Convert(char(2),Month(DateAdd(month,+3,@i_Date)))),2)) , NextYearMonth4 = Convert(int,Convert(char(4),Year(DateAdd(month,+4,@i_Date))) + RIGHT(RTrim('00' + Convert(char(2),Month(DateAdd(month,+4,@i_Date)))),2)) , NextYearMonth5 = Convert(int,Convert(char(4),Year(DateAdd(month,+5,@i_Date))) + RIGHT(RTrim('00' + Convert(char(2),Month(DateAdd(month,+5,@i_Date)))),2)) , NextYearMonth6 = Convert(int,Convert(char(4),Year(DateAdd(month,+6,@i_Date))) + RIGHT(RTrim('00' + Convert(char(2),Month(DateAdd(month,+6,@i_Date)))),2)) , FirstDayPriorWeek1 = DATEADD(ww, DATEDIFF(ww, 0, @i_Date), 0) - 7 , FirstDayPriorYear1 = DATEADD(yy, DATEDIFF(yy, 366, @i_Date), 0) , FirstDayPriorYear2 = DATEADD(yy, DATEDIFF(yy, 731, @i_Date), 0) , FirstDayPriorYear3 = DATEADD(yy, DATEDIFF(yy, 1096, @i_Date), 0) , FirstDayPriorYear4 = DATEADD(yy, DATEDIFF(yy, 1461, @i_Date), 0) , FirstDayPriorYear5 = DATEADD(yy, DATEDIFF(yy, 1826, @i_Date), 0) , FirstDayPriorYear6 = DATEADD(yy, DATEDIFF(yy, 2191, @i_Date), 0) , LastDayPriorMonth1 = Convert(DateTime,Convert(char(8),dateadd(ms,-3,DATEADD(mm, DATEDIFF(mm,0,@i_date), 0)),112),1) --this calculation assumes a Monday (start) to Sunday (end) week , LastDayPriorWeek1 = Convert(DateTime,Convert(char(8),dateadd(ms,-3,DATEADD(ww, DATEDIFF(ww,0,@i_date), 0)),112),1) , LastYearLastDayPriorMonth1 = Convert(DateTime,Convert(char(8),dateadd(ms,-3,DATEADD(mm, DATEDIFF(mm,365,@i_date), 0)),112),1) --you may want to trap for leap years here , LastDayPriorYear1 = DATEADD(yy, DATEDIFF(yy, 1, @i_Date), -1) , LastDayPriorYear2 = DATEADD(yy, DATEDIFF(yy, 366, @i_Date), -1) , LastDayPriorYear3 = DATEADD(yy, DATEDIFF(yy, 731, @i_Date), -1) , LastDayPriorYear4 = DATEADD(yy, DATEDIFF(yy, 1096, @i_Date), -1) , LastDayPriorYear5 = DATEADD(yy, DATEDIFF(yy, 1461, @i_Date), -1) , LastDayPriorYear6 = DATEADD(yy, DATEDIFF(yy, 1826, @i_Date), -1) , PriorYTD1 = DATEADD(yy, -1, Convert(varchar(25),@i_Date,112)) , PriorYTD2 = DATEADD(yy, -2, Convert(varchar(25),@i_Date,112)) , PriorYTD3 = DATEADD(yy, -3, Convert(varchar(25),@i_Date,112)) , PriorYTD4 = DATEADD(yy, -4, Convert(varchar(25),@i_Date,112)) , PriorYTD5 = DATEADD(yy, -5, Convert(varchar(25),@i_Date,112)) , PriorYTD6 = DATEADD(yy, -6, Convert(varchar(25),@i_Date,112)) , NextYTD1 = DATEADD(yy, +1, Convert(varchar(25),@i_Date,112)) , NextYTD2 = DATEADD(yy, +2, Convert(varchar(25),@i_Date,112)) , NextYTD3 = DATEADD(yy, +3, Convert(varchar(25),@i_Date,112)) , NextYTD4 = DATEADD(yy, +4, Convert(varchar(25),@i_Date,112)) , NextYTD5 = DATEADD(yy, +5, Convert(varchar(25),@i_Date,112)) , NextYTD6 = DATEADD(yy, +6, Convert(varchar(25),@i_Date,112)) , FirstDayYearPriorMonth = CAST ('1/1/' + Cast(year(@i_Date) - case month(@i_Date) WHEN 1 THEN 1 ELSE 0 END as varchar(10)) as datetime) ) Example Output  
I will be writing more about SQL Server 2016, so this post is just cover step #1: installation. After downloading from Microsoft (http://www.microsoft.com/en-us/server-cloud/products/sql-server-2016/default.aspx), installation was typical. I only ran into one anomaly, the Oracle JRE. 1. If you choose to install Polybase Query Service for External Data… 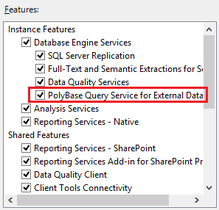 … MS will be looking for the Java SE Runtime Environment v7 or higher. You can download it from here --> http://www.oracle.com/technetwork/java/javase/downloads/jre8-downloads-2133155.html. Without the Oracle JRE installed, you will receive this failure message: 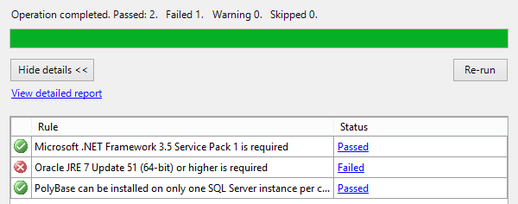 2. Take the defaults with these exceptions a.) Specify a named instance b.) Be sure to add yourself as a SQL Server Admin. I also always add a local system account that I have created specifically for SQL Server. c.) Explicitly choose your data directories d.) If you are installing on a local PC, you may wish to decrease the number of Temp DB files. 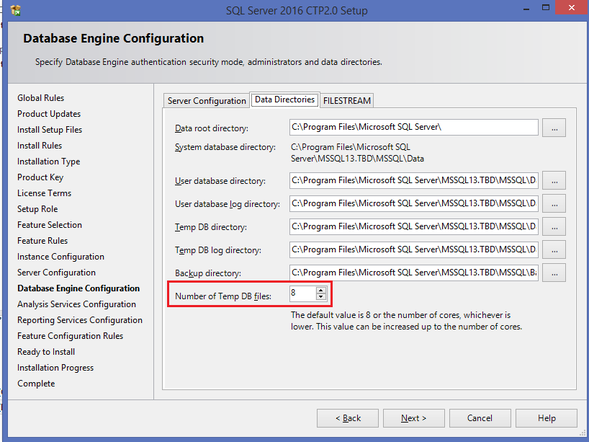 3. Be prepared to restart your computer. 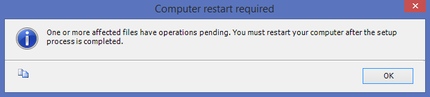 4. Install a 2nd and 3rd instance for Tabular and PowerPivot SSAS instances. (You do not need additional database engines, DQS and SSRS for your additional SSAS instances -- you only want SSAS.) Note: PolyBase Query Service for External Data can only be installed on one SQL Server instance. 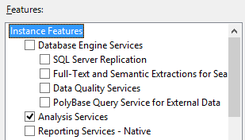 5. When complete, open your new SQL Server 2016 CTP2.0 Configuration Manager.  Your SQL 2016 installed instances should look something like this: 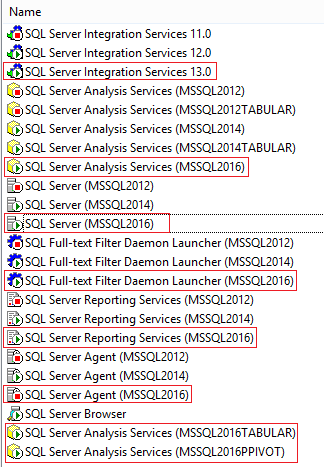 That's it! Stay tuned for more to come of SQL Server 2016 new features.
This is most assuredly a SQL Server blog site, but how often have we had to connect to an Oracle data source? (For me, I count my time with Oracle data sources in years.) If you are in SSMS, SSIS or SSAS and trying to get to Oracle, let me offer up some tips and tricks for success. This blog post will cover four areas last tested with Oracle 11g Release 2 Client.
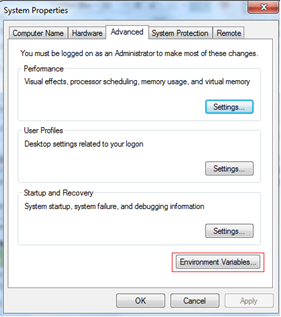
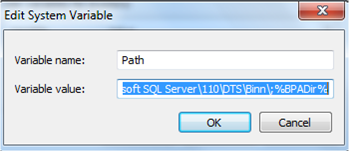
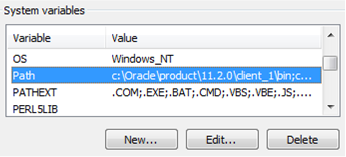
First, Downloading the Oracle Client. You will probably need both the 32-bit and 64-bit client from Oracle. You will use the 32-bit client when developing in SSIS. You will use the 64-bit client when running those packages as scheduled jobs. Please do not download the Oracle client from any other source except directly from Oracle, and be sure to download the client, not the database. The last time I needed the Oracle client, the following links worked for me: 32-bit --> http://www.oracle.com/technetwork/database/enterprise-edition/downloads/112010-win32soft-098987.html 64-bit --> http://www.oracle.com/technetwork/database/enterprise-edition/downloads/112010-win64soft-094461.html   You may be prompted to create a free Oracle web account. If you download using an Internet download accelerator, it should take no more than 15 minutes. The result should be a “win32_11gR2_client.zip” and “win64_11gR2_client.zip” file. If you have TFS (team foundation server), be nice and check it in for your fellow BI team members.  Second, Installing the Oracle Client. Start with either the 32 or 64-bit client. 1. To understand exactly what features you are installing, use a “Custom” installation. 2. Keep the default language of “English" providing you are wanting an English Oracle Client 3. Install both Clients to “C:\Oracle” specifying the “client32” or “client64” subfolder as shown below. 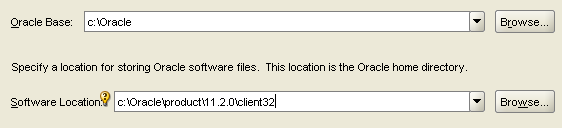 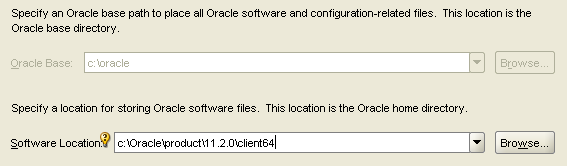 4. Install all Oracle client components EXCEPT for Oracle Net Listener and Oracle Scheduler Agent. . (If you are an experienced oracle user and know how to configure these components, feel free to install; however, they are not necessary for DW development.) 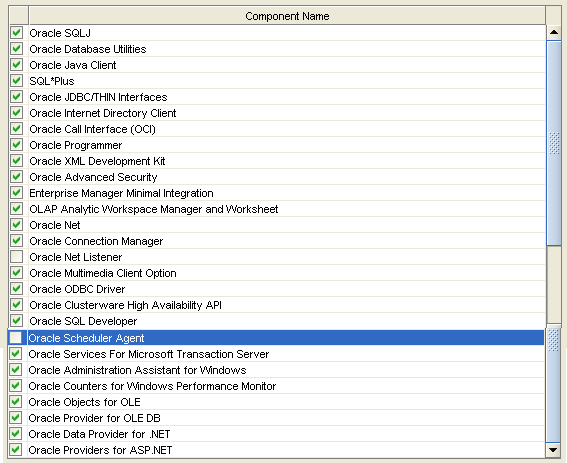  5. Accept the default port number for MTS Recovery Services 6. If your installer is unable to check memory or disc space, you will need to “Ignore All” and perform this verification manually. Note: If you are unsure of the Oracle prerequisite conditions, click “more details” under each check.  7. Click <Finish>. 8. Perform a typical configuration as you will overwrite the tnsnames.ora file. This is discussed in the "Connecting" section following. 9. Repeat Steps #1 to #8 for your second Client installation. 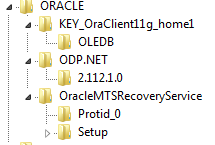 At this point I hear you asking, "Are we there yet?" Hang in there with me. We are on the home stretch!, but the next few steps are key critical to your Oracle Client success. 10. Verify that your HKEY_LOCAL_MACHINE\SOFTWARE\Oracle and HKEY_CURRENT_USER\SOFTWARE\Oracle system registries now have these entries: 11. Verify your “Path” environment variable has your 32 bit Oracle path BEFORE your 64 bit path. a. In System Properties, click the <Environment Variables> button b. Find ‘Path’ in System Variables and click <Edit>. c. Copy the Variable Value out to your clipboard, paste it into a Text file, and save it in case you want to rollback. Your Variable Values now look something like this. Identify your 32-bit paths, highlighted here in green.
d. Copy and paste your 32 bit path to sit BEFORE your 64 bit path. Your Variable Value should now look something like this. Make sure you don’t leave empty spaces (!).
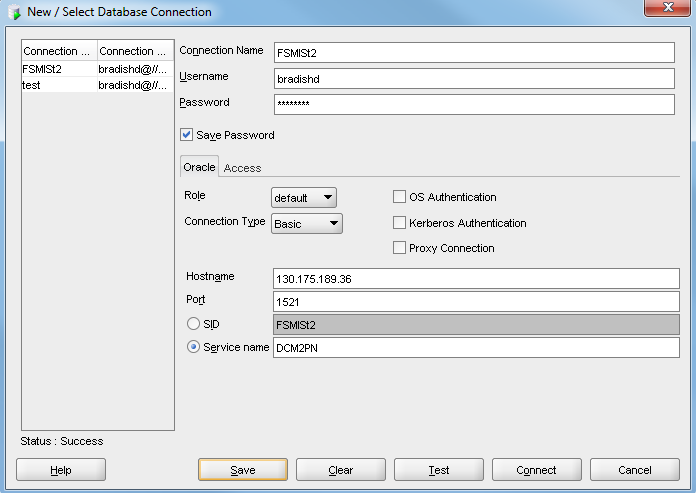
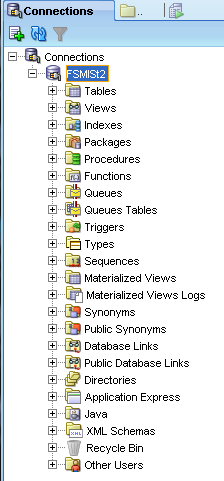
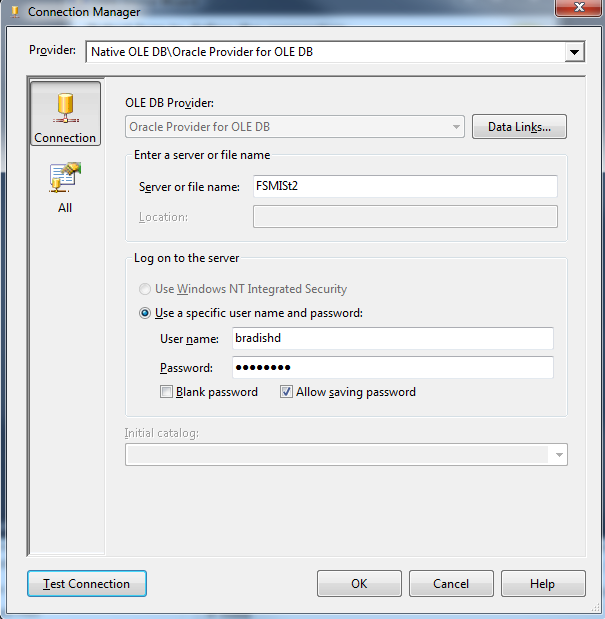
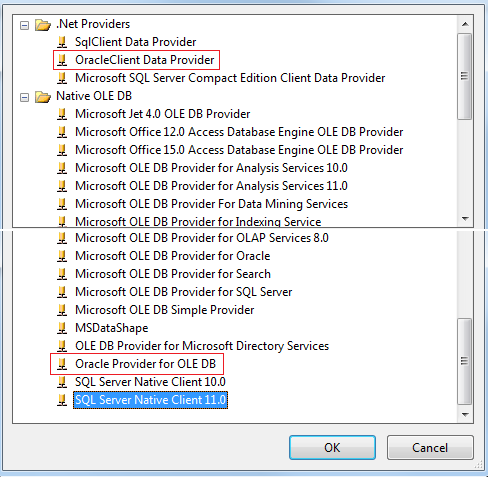
e. Click <OK> to close your Edit System Variable window and save your changes. 12. Reboot your PC to have your “Path” environment variable update take effect. Third, Connecting to Oracle You can use several tools to connect to Oracle. Before beginning, verify that your “tnsnames.ora” file (located in [YourOracleHomeDirectory]\product\11.2.0\client_1\network\admin) has the correct information as shown below. #--------------------- # My Project Name #Replace the server name below with your Oracle server name #Replace the IP addresses with your IP address #------------------------ FSMISt2 = (DESCRIPTION = (ADDRESS_LIST = (ADDRESS = (PROTOCOL = TCP)(HOST = 130.175.189.36)(PORT = 1523)) (ADDRESS = (PROTOCOL = TCP)(HOST = 130.175.189.37)(PORT = 1523)) ) (LOAD_BALANCE = yes) (CONNECT_DATA = (SERVER = DEDICATED) (SERVICE_NAME = DCM2PN) ) ) 1. From Visual Studio 2010 Ultimate, choose Tools --> Connect to Database from the main menu. 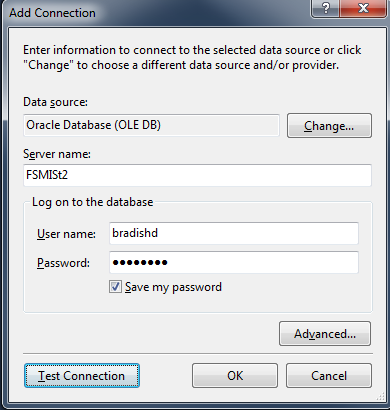 2. From SQL Developer, add a new connection. Remember that SQL Developer does not use the tnsnames.ora, but rather Java. If you are prompted for your jave.exe location, you will find it in [YourOracleHomeDirectory]\product\11.2.0\client_1\jdk\bin\java.exe. Enter your connection information as shown below. 3. From an Analysis Services Multidimensional project, you can add a new data source, then create a Data Source View.
4. To connect to Oracle from SSMS (SQL Server Management Studio), you can create a linked server. This is not shown here.
Last, Uninstalling the Oracle Client. Sometimes your install doesn't go as planned -- like misnaming your Oracle installation folders. Read Oracle’s instructions for uninstalling their software here --> (http://docs.oracle.com/html/B13804_02/deinstall.htm However, here are my tips and tricks when uninstalling Oracle:
|
|||||||
| Microsoft Data & AI | Database administration |


 RSS Feed
