|
This is most assuredly a SQL Server blog site, but how often have we had to connect to an Oracle data source? (For me, I count my time with Oracle data sources in years.) If you are in SSMS, SSIS or SSAS and trying to get to Oracle, let me offer up some tips and tricks for success. This blog post will cover four areas last tested with Oracle 11g Release 2 Client.
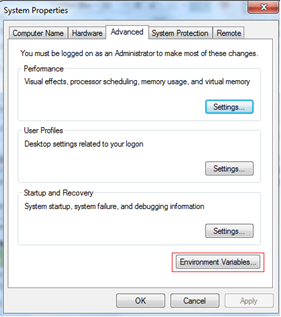
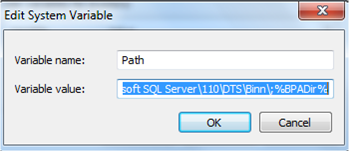
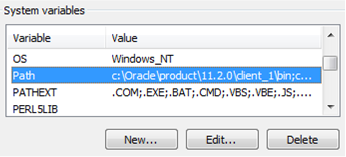
First, Downloading the Oracle Client. You will probably need both the 32-bit and 64-bit client from Oracle. You will use the 32-bit client when developing in SSIS. You will use the 64-bit client when running those packages as scheduled jobs. Please do not download the Oracle client from any other source except directly from Oracle, and be sure to download the client, not the database. The last time I needed the Oracle client, the following links worked for me: 32-bit --> http://www.oracle.com/technetwork/database/enterprise-edition/downloads/112010-win32soft-098987.html 64-bit --> http://www.oracle.com/technetwork/database/enterprise-edition/downloads/112010-win64soft-094461.html   You may be prompted to create a free Oracle web account. If you download using an Internet download accelerator, it should take no more than 15 minutes. The result should be a “win32_11gR2_client.zip” and “win64_11gR2_client.zip” file. If you have TFS (team foundation server), be nice and check it in for your fellow BI team members.  Second, Installing the Oracle Client. Start with either the 32 or 64-bit client. 1. To understand exactly what features you are installing, use a “Custom” installation. 2. Keep the default language of “English" providing you are wanting an English Oracle Client 3. Install both Clients to “C:\Oracle” specifying the “client32” or “client64” subfolder as shown below. 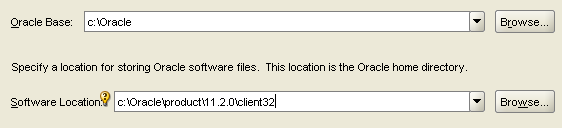 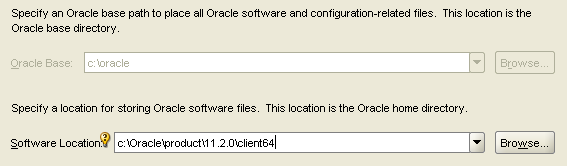 4. Install all Oracle client components EXCEPT for Oracle Net Listener and Oracle Scheduler Agent. . (If you are an experienced oracle user and know how to configure these components, feel free to install; however, they are not necessary for DW development.) 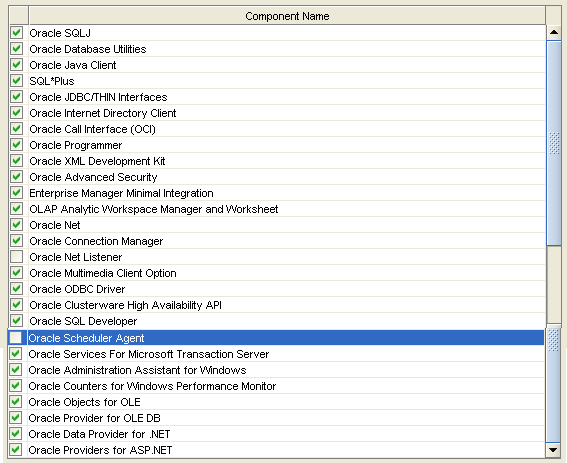  5. Accept the default port number for MTS Recovery Services 6. If your installer is unable to check memory or disc space, you will need to “Ignore All” and perform this verification manually. Note: If you are unsure of the Oracle prerequisite conditions, click “more details” under each check.  7. Click <Finish>. 8. Perform a typical configuration as you will overwrite the tnsnames.ora file. This is discussed in the "Connecting" section following. 9. Repeat Steps #1 to #8 for your second Client installation. 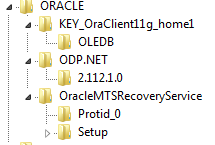 At this point I hear you asking, "Are we there yet?" Hang in there with me. We are on the home stretch!, but the next few steps are key critical to your Oracle Client success. 10. Verify that your HKEY_LOCAL_MACHINE\SOFTWARE\Oracle and HKEY_CURRENT_USER\SOFTWARE\Oracle system registries now have these entries: 11. Verify your “Path” environment variable has your 32 bit Oracle path BEFORE your 64 bit path. a. In System Properties, click the <Environment Variables> button b. Find ‘Path’ in System Variables and click <Edit>. c. Copy the Variable Value out to your clipboard, paste it into a Text file, and save it in case you want to rollback. Your Variable Values now look something like this. Identify your 32-bit paths, highlighted here in green.
d. Copy and paste your 32 bit path to sit BEFORE your 64 bit path. Your Variable Value should now look something like this. Make sure you don’t leave empty spaces (!).
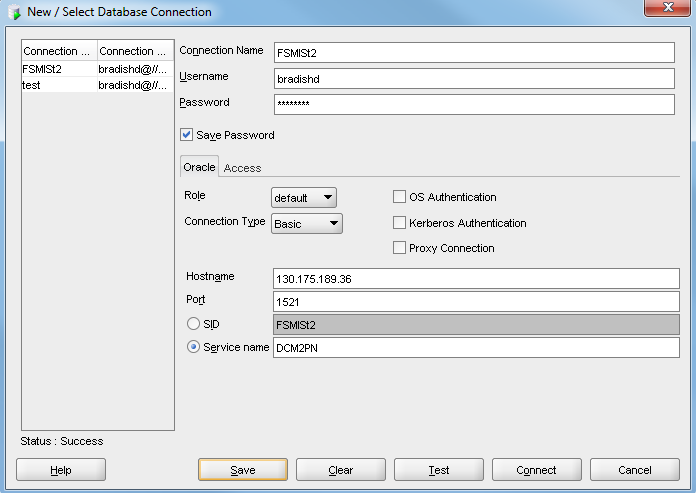
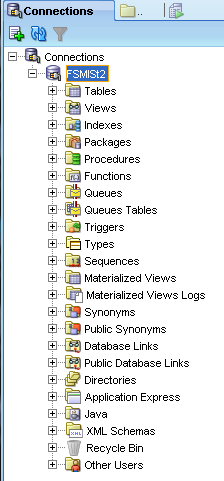
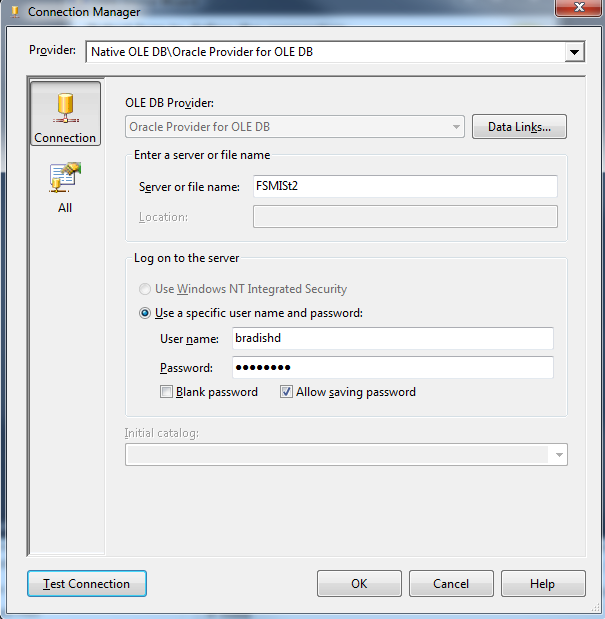
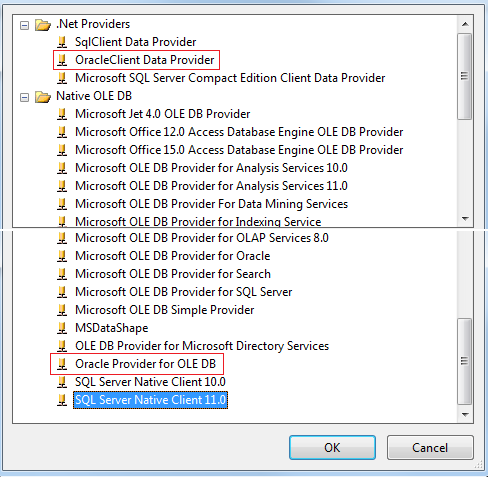
e. Click <OK> to close your Edit System Variable window and save your changes. 12. Reboot your PC to have your “Path” environment variable update take effect. Third, Connecting to Oracle You can use several tools to connect to Oracle. Before beginning, verify that your “tnsnames.ora” file (located in [YourOracleHomeDirectory]\product\11.2.0\client_1\network\admin) has the correct information as shown below. #--------------------- # My Project Name #Replace the server name below with your Oracle server name #Replace the IP addresses with your IP address #------------------------ FSMISt2 = (DESCRIPTION = (ADDRESS_LIST = (ADDRESS = (PROTOCOL = TCP)(HOST = 130.175.189.36)(PORT = 1523)) (ADDRESS = (PROTOCOL = TCP)(HOST = 130.175.189.37)(PORT = 1523)) ) (LOAD_BALANCE = yes) (CONNECT_DATA = (SERVER = DEDICATED) (SERVICE_NAME = DCM2PN) ) ) 1. From Visual Studio 2010 Ultimate, choose Tools --> Connect to Database from the main menu. 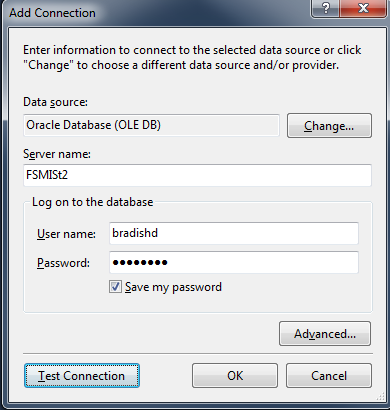 2. From SQL Developer, add a new connection. Remember that SQL Developer does not use the tnsnames.ora, but rather Java. If you are prompted for your jave.exe location, you will find it in [YourOracleHomeDirectory]\product\11.2.0\client_1\jdk\bin\java.exe. Enter your connection information as shown below. 3. From an Analysis Services Multidimensional project, you can add a new data source, then create a Data Source View.
4. To connect to Oracle from SSMS (SQL Server Management Studio), you can create a linked server. This is not shown here.
Last, Uninstalling the Oracle Client. Sometimes your install doesn't go as planned -- like misnaming your Oracle installation folders. Read Oracle’s instructions for uninstalling their software here --> (http://docs.oracle.com/html/B13804_02/deinstall.htm However, here are my tips and tricks when uninstalling Oracle:
3 Comments
|
| Microsoft Data & AI | Database administration |


 RSS Feed
